


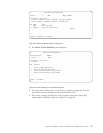


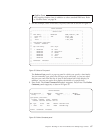
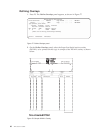
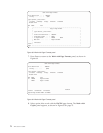

4. The Map Bar Code panel is a multi-panel pop-up used to select, define, and
position the bar code. The zip code is at row 15, column 16, and the value is
shown. Map it (make a copy of the zip code) in bar code to a position starting
at 1.1 inches down and 1.6 inches across the paper. It could have also been
positioned by row and column. In either case, it will appear just above the
name and address. Position the cursor in the Bar code type field and press F4
to display a list of supported bar code types.
5. Select 12, which is POSTNET, and Page Down to see additional optional bar
code type information.
Note: To successfully print your POSTNET bar code mapping, you must
specify the correct number of digits (5 or 9, for example) for the type of
POSTNET bar code you selected.
Note that non-numeric characters, such as the dash that is contained in the ZIP
+ 4 code, are removed on the second panel for you.
6. Press Enter to return to the Define Field Mapping panel.
7. Press F3. The Define Constants panel appears, as shown in Figure 73 on
page 66.
..............................................................................
: Map Bar Code :
: :
: Type choices, press Enter. :
: :
: From Row / Column : 15 / 16 :
: Bar code data . . : 94523-4852 :
: :
: Position across . . 1.1 *INCH Value :
: Position down . . . 1.6 *INCH Value :
: :
: Rotation ..... *DEFAULT *DEFAULT, 0, 90, 180, 270 :
: Color . ...... *PRTDEF *PRTDEF, Value F4 for list :
: :
: Bar code type . . . 12 Value F4 for list :
: :
: :
: :
: More... :
: F4=Prompt F12=Cancel :
: F22=Set Units :
: :
:............................................................................:
Figure 72. Map Bar Code panel
Chapter 4. Building an APU Print Definition for Multiple Page Formats 65