


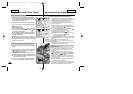

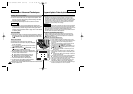
Réglage de la mise au point
✤ En mode Photo <Camera>, la mise au point automatique n’est pas faite tant que
le bouton PHOTO <PHOTO> n’est pas enfoncé jusqu’à mi-course.
✤ Afin d’obtenir une bonne qualité d’image, veuillez vérifier que la mise au point
est correctement effectuée avant d’enfoncer complètement le bouton PHOTO
<PHOTO>.
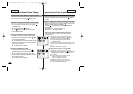
✤ Pendant la mise au point (en appuyant sur le bouton PHOTO <PHOTO>
jusqu’à mi-course), une icône clignotante ( ) s’affiche sur l’écran LCD.
Une fois la mise au point correctement réglée, le voyant vert ( ) apparaît.
✤ Une fois la mise au point terminée, un signal sonore retentit.
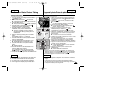
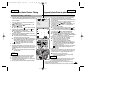
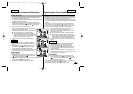
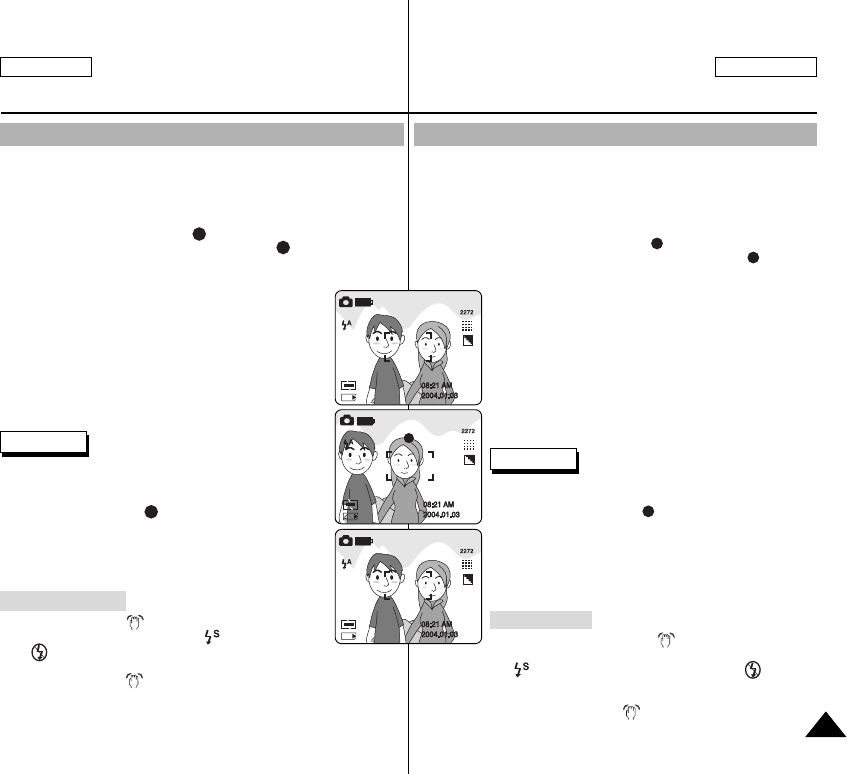
1. Centrez votre sujet dans la zone de mise au point AF sur
l’écran LCD afin de visualiser le sujet nettement.
2. Appuyez sur le bouton PHOTO <PHOTO> jusqu’à mi-course
pour ajuster la mise au point.
■
Lorsque la mise au point est prête, un signal sonore retentit.
■
Pour conserver votre mise au point tout en recadrant la
photo, maintenez la pression jusqu’à mi-course sur le bouton
PHOTO <PHOTO>. Cela peut s’avérer utile lorsque votre
sujet principal ne se trouve pas au centre de votre plan.
3. Appuyez à fond sur le bouton PHOTO <PHOTO> pour prendre
la photo.
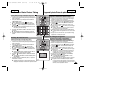
Remarques
✤ Si la mise au point n’est pas correctement effectuée, relâchez le
bouton PHOTO et appuyez à nouveau jusqu’à mi-course.
✤ L’icône rouge clignotante ( ) apparaît au-dessus de
l’indicateur de zone de mise au point lorsque la mise au point
ne peut être effectuée. Le cas échéant, relâchez le bouton
PHOTO et réessayez.
✤ Utilisez le mode MACRO <MACRO> pour photographier des
objets très proches, sans quoi la mise au point correcte ne sera
pas nette (reportez-vous à la page 114).
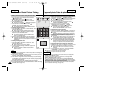
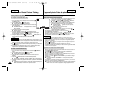
Alerte vibrations
✤ Le voyant d’alerte vibrations ( ) s'affiche lorsque vous
réglez le mode flash sur Slow Sync <Synchronisation lente>
( ) ou sur Flash Cancel <Annulation flash> ( ) dans des
conditions de faible luminosité.
✤ Utilisez une trépied ou activez le flash intégré pour obtenir des images nettes
lorsque le voyant d’alerte vibrations ( ) est affiché.
✤ Pour modifier le mode flash, reportez-vous à la page suivante.
L’appareil photo: Prise de photos avancée
ENGLISH FRANÇAIS
109109
The Camera: Advanced Techniques
Setting the Focus
✤ In Camera modes, the automatic focus will not engage unless the
PHOTO button is pressed halfway down.
✤ To get good image quality, please verify the focus is set properly before
fully depressing the PHOTO button.
✤ While the camera is focusing (when pressing the PHOTO button
halfway down), a flashing icon ( ) will appear on the LCD monitor.
Once the focus is set properly, green indicator ( ) will appear.
✤ A sound effect will play once the focus is set.
1. Frame your subject inside the AF focus area on the LCD
monitor in order to obtain clear focus.
2. Press the PHOTO button halfway down to adjust the focus.
■ When the focus is set, a sound effect will play.
■ You can maintain focus by continuing to press the
PHOTO button halfway down in order to change your
framing. This is useful when your main subject is not
located in the center area of your frame.
3. Press the PHOTO button firmly to take the picture.
✤ If the focus is not properly set, release the PHOTO
button and then press the PHOTO button halfway down
again.
✤ The flashing red icon ( ) will appear over the Focus
Area Indicator when the focus cannot be set. If this
occurs, release the PHOTO button and try again.
✤ Use MACRO mode for recording images at closer range,
or proper focusing will not occur (refer to page 114).
✤ Vibration Warning ( ) indicator will appear when you
set the flash mode to Slow Sync ( ) or Flash Cancel
( ) under a dark lighting condition.
✤ Use a tripod or allow the built-in flash to fire for clear image when the
Vibration Warning ( ) indicator appears.
✤ To change your flash mode, refer to the next page.
Notes
Vibration Warning
2
2
2
00779C SCD6050 UK+FR (60-123) 7/1/04 12:48 PM Page 109