


28
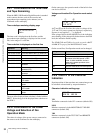
Basic Settings with the Subdisplay
Chapter 3 Basic Adjustments and Settings
However, the LOCK switches disable the buttons and dial
on their own sides. To inhibit operations on either side, set
the LOCK switch on the side to be inhibited to ON.
Turning the MENU SEL/ENTER dial can change a setting,
and pressing on it can register (ENTER) a setting.
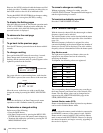
To display the Setting pages
After the camera is turned on, the selected operation mode
(CINE or CUSTOM) is displayed on the subdisplay for
several seconds, after which the Setting page that was
operated last time is displayed.
To advance to the next page
Press the PAGE button.
To go back to the previous page
Press the SET button (press and release the button within 1
second).
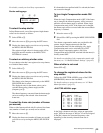
To change a setting
Press and hold the SET button for more than 1 second.
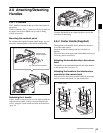
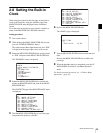
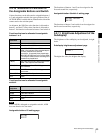
Data Change mode is entered, the cursor ( | ) starts
flashing, and the question mark (? symbol) appears at the
rightmost position on the first line.
On a page with two or more setting items, each time the
SET button is pressed, the cursor moves to the next item.
Move the cursor to the item you wish to modify then
change the setting by turning the MENU SEL/ENTER
dial.
While the subdisplay is in Data Change mode, menu
operations on the viewfinder cannot be performed.
To determine a changed setting
Perform one of the following:
• Press the PAGE button.
• Exit Data Change mode by pressing the MENU SEL/
ENTER dial (the cursor and question mark disappear).
• Terminate the subdisplay operation by pressing the VF
MENU/DISPLAY button.
To cancel a change on a setting
Without registering a change of a setting, press the
CANCEL/STATUS button. The question mark disappears,
and the original setting is restored.
To terminate subdisplay operation
Press the VF MENU/DISPLAY button.
3-2-2 Shutter Settings
With the electronic shutter ON, the shutter angle or shutter
frequency (speed) can be selected.
The selected shutter values can be checked with the status
indications displayed on the upper side of the viewfinder
(page 39).
When the frequency indication is assigned, the value
converted depending on the selected frame rate (number of
frames per second) will be displayed. The value with the
frequency value as a denominator will be the shutter speed.
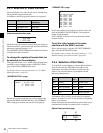
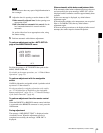
Step Shutter mode
The eight most frequently used shutter values can be
registered as step shutters and can be selected by
specifying the number.
At shipment, the following values are registered:
The corresponding shutter frequencies vary according to
the frame frequency and frame rate of the selected video
format. The step shutter values can be changed and re-
registered on the <SHUTTER ASSIGN> page of the
USER (OPERATION) menu.
Variable Shutter mode (ECS)
Shutter values that have not been registered as step shutters
can be used in Variable Shutter mode.
In a case where the remote control unit that is connected to
the REMOTE connector of the camera is used, Variable
Shutter mode is entered with ECS ON, and Step Shutter
mode is entered with SHUTTER ON. However, to display
the shutter frequencies and angles correctly, upgrading of
the version is required.
Note
STEP 360.0deg?
30 FPS AC:OFF
Cursor (flashing)
Question mark
STEP 360.0deg?
30 FPS AC:OFF
Cursor
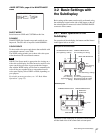
No. Shutter angle
STEP1 360.0º
STEP2 216.0º
STEP3 180.2º
STEP4 172.5º
STEP5 150.1º
STEP6 145.0º
STEP7 107.8º
STEP8 89.9º
Note