


34
Black Balance Adjustment / White Balance Adjustment (in Custom mode)
Chapter 3 Black Balance Adjustment / White Balance Adjustment (in Custom mode)
3-3 Black Balance
Adjustment
In order to maintain high picture quality when using the
camera, it is necessary to set the black balance
appropriately. After turning on the camera, apply power to
the camera for several minutes, then be sure to perform the
black balance adjustment before starting any picture
adjustment.
Automatic black balance adjustment
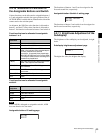
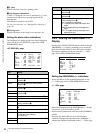
Push the assignable switch 4/AUTO BLK BAL switch on
the side of the camera or on the assistant panel down to the
position AUTO BLK BAL then release it.
Automatic black balance adjustment is performed.
During adjustment, “ABB: EXECUTING” is displayed on
the viewfinder screen. When the adjustment process is
completed successfully, the message “ABB: OK” is
displayed.
• During black balance adjustment, ND is automatically
set to 5 (CAP), and the iris is closed.
• During black balance adjustment, the gain switching
circuit will work automatically, and the viewfinder
screen will flicker several times. This is not a
malfunction.
When automatic black balance adjustment fails
If the automatic black balance adjustment process does not
end successfully, the error message “ABB: NG” will be
displayed on the viewfinder screen for approximately three
seconds.
If this error message is displayed, try black balance
adjustment again.
If the error message continues to be displayed after several
attempts, the camera requires internal inspection.
3-4 White Balance
Adjustment (in Custom
mode)
When the camera is used in Custom mode, if the lighting
conditions change, readjust the white balance.
When adjusting the white balance, select the white balance
memory. The adjustment value is fixed to 3200K when the
preset memory is selected.
The selected memory can be confirmed with the status
display on the viewfinder screen (page 39).
The memory selection can be made on the subdisplay or
from a connected RM-B150/B750 Remote Control Unit.
Automatic white balance adjustment
1
Select the memory A, B, or C, using the subdisplay or
the remote control unit (default: preset memory).
Memory C can be selected only when the Remote
Control Unit is used,
For details on how to select on the subdisplay, see “3-
2-5 Selection of the Gain, Color Temperature, and
White Balance Memory” (page 31).
2
Select the appropriate filter according to the lighting
conditions, using the subdisplay or the assignable
buttons.
See “3-2-4 Selection of the Filters” (page 30).
3
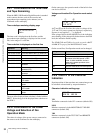
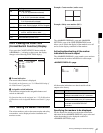
Place a white pattern in the same lighting conditions as
the subject and zoom in on it so that a white area is
obtained in the screen.
A white object (white cloth, a white wall, etc.) near the
subject may be used in place of a white pattern.
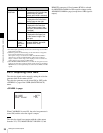
The minimum white area required for adjustment is as
illustrated below:
Notes
LOCK
VF MENU/DISPLAY CANCEL/STATUS
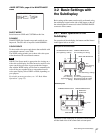
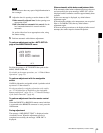
4
AUTO
BLK
BAL
PAG E
RUN
SET
AUTO BLK BAL switch
A rectangle centered in
the screen. The length of
the sides must be at least
70% of the height and
width of the screen.
Within this rectangle,
there must be an area
of white greater than
10% of the entire
screen.