


21
Setting the Focus Assist Function
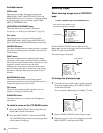
The <VF DETAIL> page is displayed.
6
Rotate the MENU SELECT knob to align the arrow
marker to the item to be set, then press the MENU
SELECT switch toward ENTER.
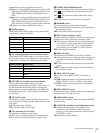
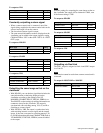
To use the VF detail signal
Set VF DETAIL to ON to activate the VF detail
function to add the detail signal to sharp edges in the
image. You can adjust the signal level (strength) in the
range of 0 to 100% (default 25%).
You can adjust the characteristics of the detail signal
with the menu items below.
CRISP: Adjust to eliminate fine portions of the detail
signal.
FREQUENCY: Change the detection band of sharp
edges.
FAT MODE: Turn ON/OFF the function to thicken
the detail signal.
FLICKER: Turn ON/OFF the function to flicker the
detail signal, which makes it easier to check the
signal on a CRT screen.
AREA: To limit the area where to display the detail
signal.
ZOOM LINK: Set the VF detail level at the full
WIDE position. (The VF detail level changes
according to the zoom position.)
To use the color detail
Set COLOR DETAIL to ON to convert the VF detail
signal to a specified color. This makes it easier to
check the signal on an LCD screen, including the
viewfinder screen. The display color can be selected at
the column next to ON.
You can adjust the coloring with the menu items
below.
PEAK COLOR: Turn ON/OFF the function to
change the color where the detail signal is
strongest.
CHROMA LEVEL: To reduce the chroma
components of the video signal (only for video
signals on the viewfinder).
7
Rotate the MENU SELECT knob to display the
desired setting, then press the MENU SELECT switch
toward ENTER.
8
To finish the adjustment, set the DISPLAY switch to
OFF to exit Menu mode.
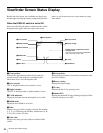
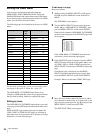
Displaying the Focus Assist
Indicators
The focus assist indicator function extracts the
irregularities of a subject and converts the integrated values
to a level indicator, which shows the focus condition.
The focus setting where the indicator shows the maximum
level is the best focus setting. (The range of the indicator
substantially changes depending on picture elements or
shooting environments. Adjust it with GAIN and OFFSET
as required.)
1
Display the CONTENTS page of the OPERATION
menu (referring to step 1 to 4 in “Adding the VF Detail
Signal”).
2
Rotate the MENU SELECT knob to align the arrow
marker (
,) to <FOCUS ASSIST>, then press the
MENU SELECT switch toward ENTER.
The <FOCUS ASSIST> page is displayed.
3
Rotate the MENU SELECT knob to align the arrow
marker to the item to be set, then press the MENU
SELECT switch toward ENTER.
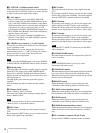
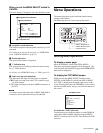
To use the level indicator
Setting INDICATOR to ON displays the level
indicator on the viewfinder.
You can set the display format with the menu items
below.
MODE: Set the type and position of the indicator.
LEVEL: Set the density and the response speed of the
indicator.
GAIN: Set the sensitivity of the indicator.
1)
OFFSET: Set the offset of the focus detection value.
2)
1) Normally, the sensitivity of the indicator is automatically set to the
optimum value in conjunction with the AREA MARKER SIZE set
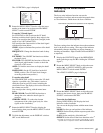
<VF DETAIL> 04 TOP
VF DETAIL : ON 25%
CRISP : 0
FREQUENCY: 9M
FAT MODE : OFF
FLICKER : OFF
AREA : 70%
ZOOM LINK: 100%
COLOR DETAIL : ON BLUE
PEAK COLOR : ON
CHROMA LEVEL: 100%
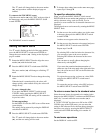
Level indicator (its position and operations can be adjusted.)
Area marker to display the detection area of the focus (its
size and position can be adjusted.)
<FOCUS ASSIST> 05 TOP
INDICATOR : OFF
MODE : BOX BOTTOM
LEVEL : 3 QUICK
GAIN : 50
OFFSET : 50
AREA MARKER: ON
SIZE : MIDDLE
POSITION : CENTER
POSITION H: 50
POSITION V: 50