


Chapter 3 iMovie HD at a Glance 37
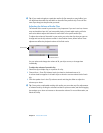
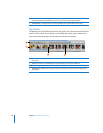
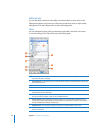
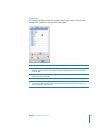
Timeline Viewer
Use the timeline viewer, shown below, to edit the video and audio clips in your movie,
and synchronize your audio and video.
A Timeline viewer button: Click to switch from the clip viewer to the timeline viewer.
B Video track: Select clips in this track to edit or add effects and titles to video clips. This track also
includes the audio contained in your video.
C Audio tracks: Add sound effects, music, and voiceover recordings. Edit audio tracks and adjust
the sound volume for clips.
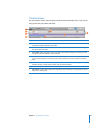
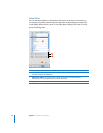
D Zoom slider: Make clips appear larger or smaller in the timeline. Enlarging or reducing the size
of clips can make them easier to select and edit.
E Volume level bar: When Show Clip Volume Levels is selected in the View menu, you see a
volume level bar appear as a line across your clips. Use this bar to raise or lower the volume of
clips.
F Audio waveforms: When Show Audio Waveforms is selected in the View menu, representations
of audio intensity in audio clips are shown here as audio waveforms.
G Audio checkboxes: Select a checkbox to hear the audio in a track. Deselect it to mute the track.
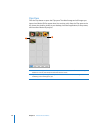
H Clip volume: Type a volume level in the text field, or click the button to use the slider to set the
volume for a selected clip.
A
D
B
E
C
H
F
G