


6 Chapter 1
Welcome to iMovie HD
Before You Begin
To make it easier to do the tasks in the tutorial, print this document before you start.
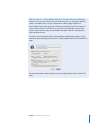
In many tasks shown here and in iMovie HD Help, you need to choose commands from
the menus in the menu bar. Menu commands look like this:
Choose Edit > Copy.
The first term after
Choose
is the name of a menu in the iMovie HD menu bar. The next
terms are the items you choose from that menu.
What You’ll Learn
If you follow all the steps in the tutorial, you will learn how to use your own video to
create a basic movie that includes a title, transitions between clips, and a soundtrack.
You’ll also learn to do the following:
Â
Crop and trim video footage
Â
Add motion to photographs using the Ken Burns Effect
Â
Trim audio clips
Â
Adjust sound volume
Â
Synchronize audio and video
Â
Share your finished movie with others
What You Need
To complete all the parts of the tutorial, you need the following:
Â
iMovie HD 6 installed on your computer
Â
Digital video footage on a camcorder or on your hard disk.
The tutorial tells you how to capture digital video from your camcorder and import it
directly into iMovie HD using a FireWire cable. If you have digital video on a flash
device or want to capture video directly from an iSight camera, open iMovie and
choose Help > iMovie HD Help. Then type “importing” in the search field. You’ll find
instructions for importing video from other locations or devices.
Â
Music files in your iTunes library
Â
Photographs in your iPhoto library
If you don’t have photographs or music in iPhoto or iTunes, you can still do the tutorial.
You can skip the related steps or read through them for future reference. Most
importantly, experiment and have fun as you learn how to get started with iMovie HD.