


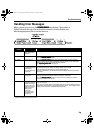


Troubleshooting
65
Ink does not eject
properly/Printing is
Blurred/Colors are
Wrong/White
Streaks appear
Print Quality is not set
properly
Be sure to set the Print Quality
Print QualityPrint Quality
Print Quality setting to High
HighHigh
High for Windows or Fine
FineFine
Fine for
Macintosh.
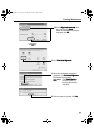
On the Main
MainMain
Main tab, click High
HighHigh
High for the Print
PrintPrint
Print Quality
QualityQuality
Quality setting.
When you cannot choose the High
HighHigh
High setting or when the print quality does not
improve, select Custom
CustomCustom
Custom, click Set
SetSet
Set, and then adjust the Quality
QualityQuality
Quality bar for higher
print quality.
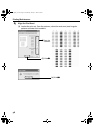
1. Select Manual
ManualManual
Manual in the Print Mode
Print ModePrint Mode
Print Mode pull-down menu in the Print
PrintPrint
Print dialog box
and then click Details
DetailsDetails
Details.
2. Click the Quality
QualityQuality
Quality icon and then drag the Print Quality
Print QualityPrint Quality
Print Quality slide bar to the Fine
FineFine
Fine
end.
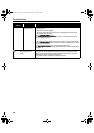
Printed Paper Curls
or Ink Blots
Paper is too thin Use Photo Paper Pro to print images that require a lot of ink (i.e. pictures with
intense colors or photographs).
Color Intensity setting
is too high
Reduce the Intensity setting in the printer driver and try printing again.
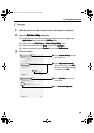
1. Open the Printer
PrinterPrinter
Printer Properties
PropertiesProperties
Properties dialog box.
2. On the Main
MainMain
Main tab, select Manual
Manual Manual
Manual for Color Adjustment
Color Adjustment Color Adjustment
Color Adjustment, and then click Set
SetSet
Set.
3. Drag the Intensity
IntensityIntensity
Intensity slide bar to adjust the intensity.
1. In the Print
PrintPrint
Print dialog box, select Color Option
Color OptionColor Option
Color Option from the pop-up menu.
2. Drag the Intensity
IntensityIntensity
Intensity slide bar to set the intensity.
Paper feed roller is
dirty
Clean the paper feed roller.
See “Paper Does Not Feed Properly
Paper Does Not Feed ProperlyPaper Does Not Feed Properly
Paper Does Not Feed Properly” on page 68.
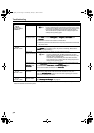
Printed Surface is
Scratched
Inappropriate paper is
used
Check if the paper you are printing on is too thick or curled.
See “
““
“Print Media to Avoid
Print Media to AvoidPrint Media to Avoid
Print Media to Avoid” on page 3.
Note that smudging may occur at the top and bottom edges of the paper when
using Borderless Printing. Ensure that the paper you are using is compatible
with Borderless Printing.
See “
““
“Media Types Suitable for Borderless Printing
Media Types Suitable for Borderless PrintingMedia Types Suitable for Borderless Printing
Media Types Suitable for Borderless Printing” on page 32.
See “Media Types Suitable for Borderless Printing
Media Types Suitable for Borderless PrintingMedia Types Suitable for Borderless Printing
Media Types Suitable for Borderless Printing” on page 35.
Thick paper is used Select Prevent paper abrasion
Prevent paper abrasionPrevent paper abrasion
Prevent paper abrasion in the printer driver.
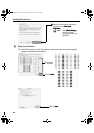
1. Open the Printer Properties
Printer PropertiesPrinter Properties
Printer Properties dialog box.
2. Click the Maintenance
MaintenanceMaintenance
Maintenance tab and then Custom Settings
Custom SettingsCustom Settings
Custom Settings.
3. Select the Prevent paper abrasion
Prevent paper abrasionPrevent paper abrasion
Prevent paper abrasion check box and click Send
SendSend
Send.
Click OK
OKOK
OK when the confirmation message appears.
1. Open the Print
PrintPrint
Print dialog box.
2. In the Paper Source
Paper SourcePaper Source
Paper Source pull-down menu, select Prevent paper abrasion
Prevent paper abrasionPrevent paper abrasion
Prevent paper abrasion.
When Prevent paper abrasion
Prevent paper abrasionPrevent paper abrasion
Prevent paper abrasion is selected in the Printer Properties
Printer PropertiesPrinter Properties
Printer Properties dialog box
(for Windows) or the Print
PrintPrint
Print dialog box (for Macintosh), the setting is also
applied under direct printing.
Problem Possible Cause Try This
i9900_QSG_US.book Page 65 Wednesday, January 7, 2004 6:09 PM