


Chapter 7: Troubleshooting and Support 91
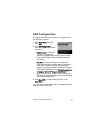
4 Two directories (folders) appear under the removable disk.
Click on the + sign next to the folder called DCIM, and a
subdirectory should appear. When you click on the
subdirectory under DCIM, the list of your images should
appear on the right side of the Explorer screen.
5 Select all the images (in the Edit pull-down menu click on
Select All), then copy them (in the Edit menu click on Copy).
6 Click on the Local Disk under My Computer. You are now
working in your computer's hard disk drive.
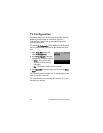
7 Create a new folder under Local Disk (go to the File pull-
down menu and click on New, then click on Folder. A folder
called New Folder appears in the right side of the Explorer
screen). While the text of this new folder is highlighted, you
can type in a new name (for example, Pictures). To change
the name of the folder later, you can simply right-click on the
folder name, choose Rename from the menu that appears,
then type in the new name.
8 Click on the new folder you just created, then go to the Edit
pull-down menu and click on Paste.
9 The images you copied in step 5 are pasted into this new
folder on your computer's hard drive. To verify that the
images were successfully transferred from the memory card,
click on the new folder. You should see the same list of files
in that folder that you saw when you looked at them on the
memory card (step 4).
10When you have verified that the images were successfully
transferred from the memory card to your computer, put the
card back in your camera. To free up space on the card,
you can either delete the images or format the card (under
the Delete option in the Playback Menu in the camera).