


66
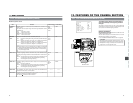
11. MENU SCREENS
11-2 Setting Menu Screens
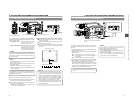
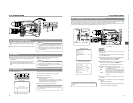
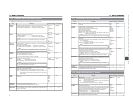
MONITOR
EDITSEARCH
FILTER
STATUS
SHUTTER
MENU
AUTO IRIS
BACK L
NORMAL
SPOT L
STRETCH
NORMAL
COMPRESS
FULL AUTO BLACK LOLUX
MODE
POWER
ON OFF
VTR
OPEN
VTR
CAM
1
3200K
5600K
5600K
5600K
ND
/
/
ND
2
.3
.4
1
8
1
64
CH-1
AUDIO INPUT
AUDIO SELECT
CH-2
CH-1 CH-2
FRONT
REAR
AUTO
MANUAL
AUDIO
LEVEL
CH-1 CH-2
PULL
OPEN
LCDBRIGHT DISPLAY
STA
SHUTTER
MENU
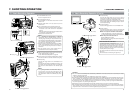
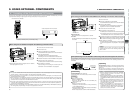
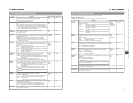
––– MENU –––
CAMERA OPERATION..
CAMERA PROCESS..
AUDIO/VIDEO..
LCD/VF..
TC/UB/CLOCK..
OTHERS..
FILE MANAGE..
MENU ALL RESET CANCEL
EXIT
––– CAMERA OPERATION –––
SHUTTER STEP
FAW PRESET
GAIN L 6dB
GAIN M 9dB
GAIN H ALC
SMOOTH TRANS ON
SPOT L/BACK L MID
ASPECT RATIO 4:3
PAGE BACK
LOLUX GAIN 30
dB
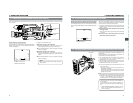
Make the settings while observing the LCD monitor or the
viewfinder screen. If the OUTPUT CHAR. item on the OTHERS
(1/2) screen is set to ON, the menu screen can also be viewed
on a monitor connected to the MONITOR OUT or Y/C OUT
connector.
1.
Set the POWER switch to ON.
2.
Set the mode of the GY-DV5000 with the MODE switch.
(Camera mode or VTR mode)
3.
Press the STATUS button for 1 second or longer.
● The TOP MENU screen appears.
4.
Select the menu screen to be set.
Rotate the SHUTTER dial to align the cursor (
) with the
menu screen to be set, and then press the SHUTTER dial.
● The selected menu screen appears.
5.
Select the menu item on the menu screen.
Rotate the SHUTTER dial to align the cursor (
) with the
item to be set, and then press the SHUTTER dial.
● The setting area of the selected item starts blinking, and
the setting can now be made.
6.
Change the setting.
Rotate the SHUTTER dial to change the setting, and then
press the SHUTTER dial.
● The setting area stops blinking and the setting is entered.
■To change multiple items, repeat the procedures in steps
5.
and
6.
above.
7.
Return to the TOP MENU.
Rotate the SHUTTER dial to align the cursor (
) with the
PAGE BACK item, and then press the SHUTTER dial.
■To change settings on other menu screens, repeat the
procedures in steps
4.
to
7.
above.
■To save the set contents in FILE CAM1 or CAM2, select the
FILE MANAGE menu screen and perform the operations for
saving to file. ☞ See “FILE MANAGE Menu Screen” on page
67.
8.
To return to the normal screen after completing the settings,
use either of the following methods.
● Press the STATUS button
or
● Return to the TOP MENU screen and align the cursor (
)
with the EXIT item, and then press the SHUTTER dial.
STATUS button
Cursor
SHUT-
TER
dial
MENU screen
TOP MENU screen
CAMERA OPERATION MENU screen
Item Setting
67
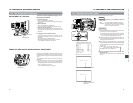
11. MENU SCREENS
11-3 FILE MANAGE Menu Screen
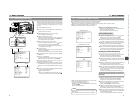
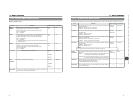
––– MENU –––
CAMERA OPERATION..
CAMERA PROCESS..
AUDIO/VIDEO..
LCD/VF..
TC/UB/CLOCK..
OTHERS..
FILE MANAGE..
MENU ALL RESET CANCEL
EXIT
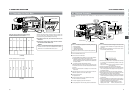
––– FILE MANAGE –––
LOAD FILE CAM1
LOAD CANCEL
STORE FILE CAM1
STORE CANCEL
RESET FILE CAM1
RESET CANCEL
PAGE BACK
––– FILE MANAGE –––
LOAD FILE CAM1
LOAD CANCEL
STORE FILE CAM1
STORE CANCEL
RESET FILE CAM1
RESET CANCEL
PAGE BACK
The FILE MANAGE menu screen is used to perform the following tasks.
● Storing menu setting contents in two types of files (CAM1, CAM2).
When saving menu setting contents that remain more or less fixed, these are stored in CAM1 or CAM2.
● Reading out a stored file (CAM1, CAM2, or current settings).
● Resetting menu setting contents to the factory settings.
■Display the FILE MANAGE menu screen.
Select the FILE MANAGE item on the TOP MENU screen,
and then press the SHUTTER dial.
● The FILE MANAGE menu screen appears.
Storing Setting Values
1.
Rotate the SHUTTER dial to align the cursor (
) with the
STORE FILE, and then press the SHUTTER dial.
● The area for setting the file name starts blinking.
2.
Rotate the SHUTTER dial to select the storage destination
file (CAM1 or CAM2), and then press the SHUTTER dial.
3.
Rotate the SHUTTER dial to align the cursor (
) with the
STORE item, and then press the SHUTTER dial.
● The CANCEL indicator in the setting value area blinks.
4.
When you rotate the SHUTTER dial to make EXECUTE in
the setting value area blink and then press the SHUTTER
dial, the menu settings are stored in the specified file.
Reading Out a Menu Settings File
1.
Rotate the SHUTTER dial to align the cursor (
) with the
LOAD FILE, and then press the SHUTTER dial.
● The area for setting the file name starts blinking.
2.
Rotate the SHUTTER dial to select the file where the setting
values are stored (CAM1 or CAM2), and then press the
SHUTTER dial.
3.
Rotate the SHUTTER dial to align the cursor (
) with the
LOAD item, and then press the SHUTTER dial.
● The CANCEL indicator in the setting value area blinks.
4.
When you rotate the SHUTTER dial to make EXECUTE in
the setting value area blink and then press the SHUTTER
dial, the menu settings stored in the specified storage
location are read out.
The power is automatically turned OFF and ON again.
Resetting the Menu Settings to the Factory
Settings.
1.
Rotate the SHUTTER dial to align the cursor (
) with the
RESET FILE, and then press the SHUTTER dial.
● The area for setting the file name starts blinking.
2.
Rotate the SHUTTER dial to select the name of the file to
be reset, and then press the SHUTTER dial.
CAM1, CAM2 CURRENT: Currently set values
3.
Rotate the SHUTTER dial to align the cursor (
) with the
RESET item, and then press the SHUTTER dial.
● The CANCEL indicator in the setting value area blinks.
4.
When you rotate the SHUTTER dial to make EXECUTE in
the setting value area blink and then press the SHUTTER
dial, the set values are reset.
The power is automatically turned OFF and ON again.
FILE MANAGE menu screen
TOP MENU screen
➡➡
● When the LOAD, STORE, RESET items are set to CANCEL,
none of the operations are executed.
● To close the FILE MANAGE menu screen:
Align the cursor (
) with the PAGE BACK item, and then press
the SHUTTER dial.
Or, press the STATUS button.
MEMO:
The currently set value is not reset even when CAM1 or
CAM2 is reset.
To reset also the currently set value, select “CURRENT”.