


4
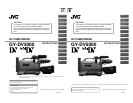
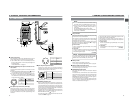
Thank you for purchasing the DV Camcorder GY-DV5000.
These instructions are for GY-DV5000.
This unit is a DV video system format camcorder.
Videocassettes marked with the
symbol or
symbol
can be used.
MAIN FEATURES
The following phenomena may occur when tapes recorded
on other units (including another GY-DV5000) are recorded
or played back on this camcorder.
●
The transient section between scenes recorded on other
units and those recorded on this unit may appear
disturbed.
●
Digital noise may appear during playback due to tracking
errors.
●
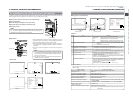
Built-in compatible mechanism for use of both standard-size
DV videocassettes and mini-size DV videocassettes
Recording/playback can be made to/from Standard DV, Mini
DV and DVCAM cassettes in DV format.
Tapes recorded in the DVCAM format can only be played
back (simple playback). Recording in the DVCAM format is
not possible.
DVCAM is a registered trademark of SONY Corporation.
●
Compact, lightweight design
Employment of aluminum die cast has resulted in an
operation-condition weight as low as approximately 5.5 kg
including lens, viewfinder, battery, and cassette.
●
DV high-quality digital format
The 4:1:1, 8-bit, 25 Mbps component digital processing
ensures recording and playback with high picture quality.
●
High sound quality based on PCM audio
Tw o types of sampling, 16-bit, 48 kHz sampling and 12-bit,
32 kHz sampling, ensure high-quality digital audio.
●
Time code reader/generator
The built-in time code reader/generator can be used to record
SMPTE time code and user’s bits.
●
Built-in 2.5" color LCD display
In addition to displaying the camera image and the playback
image, the LCD monitor shows the status screens, menu
screens for settings, and alarm indications.
●
Built-in monitor loudspeaker for audio checking
The input audio can be monitored in recording or EE mode.
The playback sound can be monitored in the playback mode.
The loudspeaker also outputs an alarm tone in case an
abnormal condition occurs in the unit.
●
Recording check function for convenient recording review and
edit search function.
●
Camera section designed with 3-CCD system for high-quality
picture
1/2" 3-CCD with 380,000 effective pixels employed. Digital
signal processing for reproduction of DV high-quality picture.
●
Super sensitivity F13, 2000 lux
2000 lux standard sensitivity increased to F13 while high S/
N is retained. Enables shooting at normal indoor illumination
eliminating the need for extra illumination.
●
LOLUX for 0.2 lux (F1.4) illumination
Employment of LOLUX mode ensures +36 dB gain. This is
ideal for difficult shooting conditions with almost no
illumination.
The gain up value can be selected in the menu.
●
Multi-Zone Auto Iris Detection Circuit
Multi-zone auto iris detection circuit ensures optimum iris
position even in backlit conditions or when a bright subject
moves in a frame. Switch provided for selecting over or under
level.
●
Safety Zone indication in viewfinder
Two types of safety zone indicator functions provided.
●
Zebra pattern video level indication in viewfinder
●
Full Auto Shooting (FAS) function
Eliminating the need for troublesome switch or filter
operations, the FAS function automatically provides a wide
range of compatibility with shooting conditions which varies
as you move between indoors and outdoors or between bright
and dark locations.
●
Color temperature conversion filters for 3200K, 5600K, 5600K
+ 1/8ND, 5600 + 1/64ND provided.
●
Variable scan shutter
Eliminates flicker when shooting other screen pictures than
NTSC, such as computer monitor screens.
Copes with the range from 60.1 Hz to 2084.6 Hz.
●
DV (i. LINK) connector
DV connector (4-pin) provided. Enables transfer of digital data
to other equipment provided with DV connector, such as a
non-linear editing system.
●
1/2" bayonet type lens
●
Camera output, VCR playback output (composite/YC)
possible
●
Built-in color bar (SMPTE type)
●
Superior operability with shutter speed and menus selected
by dial.
●
Connection to network possible (when the optional Network
Pack KA-DV5000 is attached)
Video and audio streaming data can be transmitted through
a LAN card and recorded on memory cards.
●
This unit records and plays back in the SP mode.
Recording or playback in the LP mode is not possible.
●
Due to manufacturing dispersion of tapes, we
recommend not to record pictures within the first 2 to 3
minutes from the beginning of the tape.
●
Before recording important scenes, be sure to perform
a test recording and confirm that both video and audio
are recorded correctly.
●
Recorded video and audio contents are for private use.
Other use may infringe on the rights of copyright holders.
●
JVC cannot assume liabilities that may derive from the
impossibility of normal recording or playback of video or
audio due to malfunction of the camcorder or the
videocassette.
5
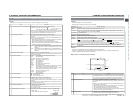
CONTENTS
INTRODUCTION
MAIN FEATURES ............................................................... 4
1. INTRODUCTION
1-1 Precautions for Proper Use........................................ 6
1-2 Routine and Periodical Maintenance ......................... 7
1-3 Precautions for Use of Head Cleaning Tape .............. 8
1-4 Videocassette to be Used .......................................... 8
1-5 Battery Pack to be Used ............................................ 8
1-6 Condensation ............................................................. 9
1-7 Characteristic CCD Phenomena ................................ 9
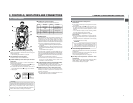
2. CONTROLS, INDICATORS AND CONNECTORS
2-1 Front Section ............................................................ 10
2-2 Right Side Section.................................................... 12
2-3 Left Side Section...................................................... 16
2-4 Top Section .............................................................. 17
2-5 Rear Section ............................................................ 18
2-6 Indications on the LCD Monitor and in
the Viewfinder .......................................................... 20
2-7 Lens (Optional)......................................................... 27
2-8 1.5-Inch Viewfinder (Optional) .................................. 28
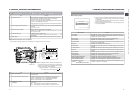
PREPARATIONS
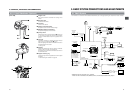
3. BASIC SYSTEM CONNECTIONS AND
ADJUSTMENTS
3-1 Basic System ........................................................... 29
3-2 Attaching the Zoom Lens ......................................... 30
3-3 Attaching the Viewfinder........................................... 30
3-4 Attaching the Microphone (Provided)....................... 31
3-5 Attaching the Microphone (Optional)........................ 31
3-6 Attaching the Tripod Base (Provided)....................... 32
4. POWER SUPPLY
4-1 AC Operation ........................................................... 33
4-2 Battery Pack Operation (Optional) ........................... 33
BASIC OPERATIONS
5. PREPARATIONS
5-1 Turning the Power ON .............................................. 37
5-2 Cassette Loading and Unloading ............................. 38
5-3 Viewing the LCD Monitor ......................................... 40
5-4 Setting, Displaying and Recording the Date
and Time .................................................................. 41
5-5 Charging the Built-in Battery .................................... 44
6. SETTING AND ADJUSTMENTS BEFORE
SHOOTING
6-1 Camera Settings ...................................................... 45
6-2 Screen Size (4:3/LETTER) Mode Selection............. 45
6-3 Viewfinder Adjustment ............................................. 46
6-4 External Monitor Adjustment .................................... 46
6-5 Back Focus Adjustment............................................ 47
6-6 White Balance Adjustment ....................................... 48
6-7 Audio Input Signal Selection .................................... 49
6-8 Recording Level Adjustment .................................... 50
6-9 Monitoring Audio during Recording.......................... 51
7. SHOOTING OPERATION
7-1 Basic Recording Operation ...................................... 52
7-2 Searching for Recorded Scenes (Edit Search) ........ 54
7-3 If the Record-Standby Mode Continues ................... 55
7-4 Checking Recorded Contents in Record-Standby
Mode (Recording Check Function) .......................... 55
7-5 Recording the Color Bars......................................... 56
8. PLAYBACK MODE
8-1 Playback Procedure ................................................. 57
8-2 Fast-Forward, Rewind .............................................. 58
8-3 Search...................................................................... 58
8-4 Blank Search............................................................ 58
8-5 Outputting CH-3, CH-4 Channel Audio .................... 59
APPLICATION
9. USING EXTERNAL COMPONENTS
9-1 Connecting a Video Component with
DV Connector........................................................... 60
10. TIME CODE OPERATION
10-1 Displaying Time Code .............................................. 62
10-2 Presetting and Recording of Time Code .................. 62
10-3 Recording Time Codes in Continuation of Time
Codes Recorded on Tape ........................................ 64
10-4 Reproducing Time Codes......................................... 64
11. MENU SCREENS
11-1 Menu Screen Configuration ..................................... 65
11-2 Setting Menu Screens.............................................. 66
11-3 FILE MANAGE Menu Screen................................... 67
11-4 TOP MENU Screen.................................................. 68
11-5 CAMERA OPERATION Menu Screen...................... 69
11-6 CAMERA PROCESS MENU Screen ....................... 70
11-7 ADVANCED PROCESS Screen............................... 71
11-8 SKIN COLOR ADJUST Screen............................... 71
11-9 AUDIO/VIDEO Menu Screen ................................... 72
11-10
LCD/VF Menu Screen .............................................. 73
11-11
TC/UB/CLOCK Menu Screen................................... 75
11-12
TIME/DATE Menu Screen ........................................ 76
11-13
OTHERS Menu Screen ............................................ 77
12. FEATURES OF THE CAMERA SECTION
12-1 Full-Time Auto White Balance (FAW) ....................... 79
12-2 IRIS (Brightness) Adjustment................................... 80
12-3 Adjusting the Shutter Speed .................................... 81
12-4 Shooting the Screen Image on a Computer
Monitor ..................................................................... 82
12-5 Gain (Sensitivity) Adjustment ................................... 83
12-6 Switch Setup According to Illumination
and Subject .............................................................. 84
12-7 How to Use Skin Detail ............................................ 85
OTHERS
13. OTHERS
13-1 Alarm Indications and Actions.................................. 87
13-2 Troubleshooting........................................................ 90
13-3 Hour Meter Display .................................................. 91
13-4 Specifications ........................................................... 92