38 EN
Setting Up the Camera Using RM-P2580 (continued)
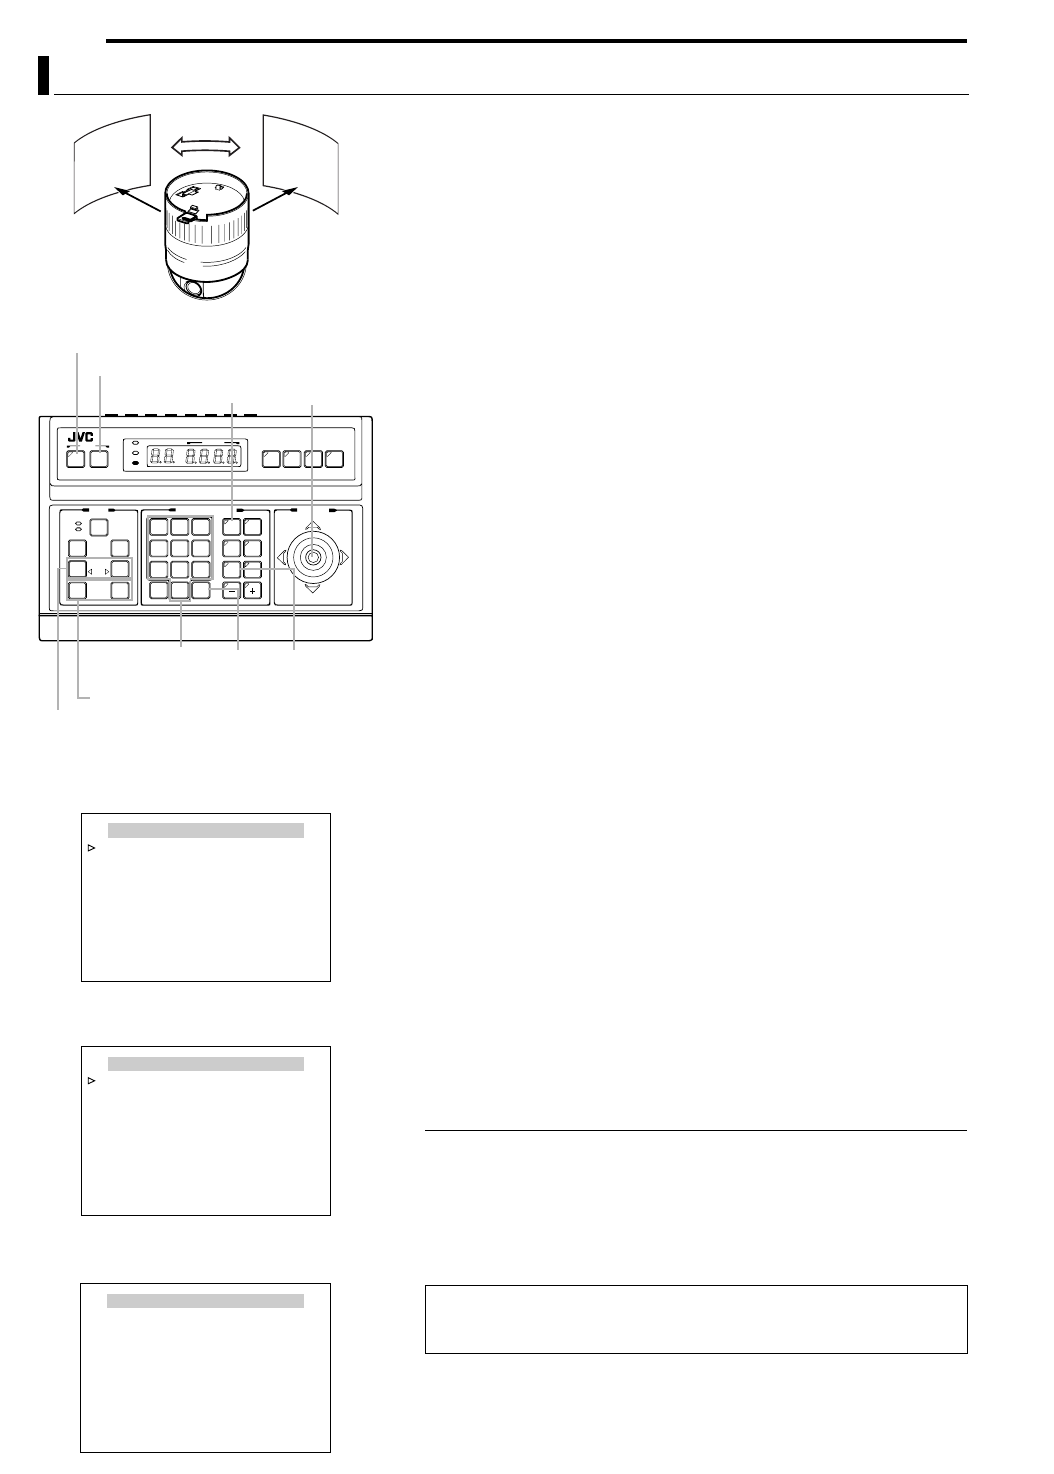
AUTO PAN Setup
This section describes procedures for setting the Auto Pan
function, which enables gradual horizontal rotation of the
camera. There are 3 Auto Pan modes, namely movement
between 2 points, rightward rotation and leftward rotation.
1 Select camera. (ARM-P2580 AINSTRUCTIONSB)
CAMERA buttonNNumeric key (Camera Number)NENTER button
●Video images of the selected camera will be output.
2 Display the MENU screen. (A pg. 21, steps 2 to 4)
MENU button (3 sec.) N Select ACAMERA..B using the PAN lever NSET
button.
●The AMENUB screen will be displayed.
3 Move the PAN lever upward/downward to shift the cursor (E)
to the AAUTO PAN/PATROL/TRACE..B item, followed by
pressing the SET button.
●The AAUTO PAN/PAT RO L/TRACEB screen will be displayed.
4 Press the SET button.
●Check that the cursor is at the AAUTO PAN SET..B item and press SET
button.
5 Set the AUTO PAN MODE and AUTO PAN SPEED.
●Set the type of Auto Pan movement using the AUTO PAN MODE item.
RETURN (Movement between 2 points), RIGHT and LEFT
●Set the rotating speed of Auto Pan using the AUTO PAN SPEED item.
LOW, NORMAL, HIGH
6 Shift the cursor (E) to the AA. PAN POS. SET..B item, and
press the SET button (only when in the Return mode).
●The AAUTO PAN POSITION SETB screen will be displayed.
7 Adjust the angle of view at the start position (only when in
the RETURN mode).
●Use the PAN lever, FOCUS button and ZOOM button for adjustment.
●Tilting operations or lens operations such as focusing and zooming are
not possible at the return position.
●During setting, a message indicating A[START] POS.SET NB will be
displayed at the bottom left of the screen.
8 Press the SET button (only when in the RETURN mode).
This switches the start position to the end position.
9 Set the end position (only when in the RETURN mode).
●Set the return position using the PAN lever.
●During setting, a message indicating AO [END] POS.SETB will be
displayed at the bottom right of the screen.
10 Press the MENU button.
The Auto Pan position that has been set will be stored and the screen
will return to the previous menu (AAUTO PA N SETB screen).
MEMO
●Vertical movement (tilting) and lens operations are not possible at the return
position.
●Writing of preset data may fail if the SET button or MENU button is pressed when
the camera is moving. Ensure that the camera has come to a stop before pressing
the SET button and MENU button.
●The Manual Pan Limit mode will be temporarily turned OFF when this menu is
displayed. Manual Pan Limit can be set upon exiting this menu without affecting the
Auto Pan operation.
To enable Auto Pan operation upon setting, press the AUTO PAN button
on RM-P2580.
A RM-P2580 "Auto Pan operation", INSTRUCTIONS
Image of
end position
Image of
star t position
Gradual Rotation
SETUP
MENU SET
SPEED
IRIS
AF
FOCUS
ZOOM
OPEN
FAR
TELE CLEAR
/HOME
7
4
1
8
0
5
2
9
6
3
ENTER
AUTO
PAN
OPTION
1
OPTION
2
CAMERA
POSI-
TION
AUTO
PATROL
CLOSE
NEAR
WIDE
AUTO F-1 F-2 F-3
PAN/TILTLENS
CAMERA/POSITION
CAMERA POSITION
REMOTECONTROLUNIT
RM-P2580
ALARM
POWER
KEYLOCK
MENU button
CAMERA button
SET button
PAN lever
ZOOM button
ENTER
button
FOCUS button
Numeric
keys
AUTO PAN
button
AUTO PAN / PATROL / TRACE
AUTO PAN SET..
AUTO PATROL SET..
AUTO TRACE SET..
AUTO PAN / TRACE VIDEO ..
RM.A.PAN KEY A.PAN
RM.A.PATROL KEY A. PATROL
<
MENU
>
RETURN
<
SET
>
SUB MENU
AUTO PAN/PATROL/TRACE screen
AUTO PAN SET
AUTO PAN MODE RETURN
AUTO PAN SPEED NORMAL
A.PAN POS . SET..
<
MENU
>
RETURN
AUTO PAN SET screen
AUTO PAN POSITION SET
<
SET
>
INVALID
DURING PAN MOVEMENT
<
MENU
>
RETURN
<
SET
>
L/R
[START] POS.SET
→
AUTO PAN POSITION SET screen


