


EN 39
Setting Up the Camera Using RM-P2580 (continued)
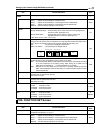
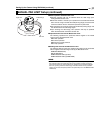
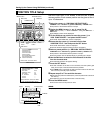
AUTO PATROL Setup
Use the AUTO PATROL screen to set the configuration of the
Auto Patrol function, which moves the camera between
several positions at a high speed. Patrol positions 1-100 can
be set in each of three modes (MODES 1 to 3). It is
recommended that these three modes be set according to the
day of the week or the time of day. For example: MODE 1 for
nighttime and MODE 2 for daytime.
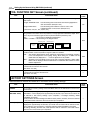
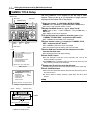
1 Select the camera. (A RM-P2580 AINSTRUCTIONSB)
CAMERA buttonNNumeric key (Camera Number)NENTER button
●The picture of the selected camera is output.
2 Display the MENU screen. (A pg. 21, steps 2 to 4)
MENU button (3 sec.) N Select ACAMERA..B using the PAN lever NSET
button.
●The AMENUB screen will be displayed.
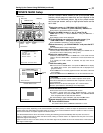
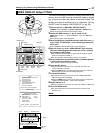
3 Tilt the PAN lever up or down to move the cursor (E) to
AAUTO PAN/PATROL/TRACE..B and press the SET button.
●The AAUTO PAN/PATROL/TRACE..B screen is displayed.
4 Move the cursor (E) to AAUTO PATROL SET..B and press the
SET button.
●The AAUTO PATROL SET MODE 1B screen is displayed.
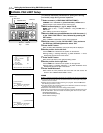
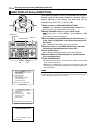
5 Tilt the PAN lever to move the cursor (E) to the PATROL
position to be set.
●To display the next page (PATROL positions 9 to 19), press the TELE
button.
●To display the previous page, press the WIDE button.
6 Set a patroll position.
POSITION buttonNNumeric key (position number) N ENTER button
●Positions from PATROL 1 to 100 are set in the order of HOME, followed
by POS 1 to POS 99.
7 Set the length of time a camera will stay in each position.
●Use the PAN lever to the left or right to set the time period.
●Available set values: SKIP, 10s, 20s, 30s, 45s, 1min, 2min. (Selecting
ASKIPB skips that position and moves to the next position.)
●The factory setting is 10s for all positions.
8 Repeat steps 5 to 7 for each patrol position.
●Set the patrol positions and time periods of all patrol numbers in the
same way.
9 Change the Auto Patrol mode.
●Press the FAR button or NEAR button to change the mode.
●After changing to a new mode, repeat steps 5 to 8.
10 Press the MENU button.
●The screen returns to the previous menu.
●After the above setup, Auto Patrol of the camera can be started by
pressing the AUTO PATROL button on the RM-P2580.
●To change the Auto Patrol mode after the above setup, display the
AUTO PATROL SET MODE screen and press the FAR button or NEAR
button.
●The Auto Patrol function can only be set from an RM-P2580. Note that it
differs to auto sequence operations available with other remote control
units.
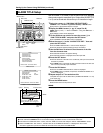
SETUP
MENU SET
SPEED
IRIS
AF
FOCUS
ZOOM
OPEN
FAR
TELE CLEAR
/HOME
7
4
1
8
0
5
2
9
6
3
ENTER
AUTO
PAN
OPTION
1
OPTION
2
CAMERA
POSI-
TION
AUTO
PATROL
CLOSE
NEAR
WIDE
AUTO F-1 F-2 F-3
PAN/TILTLENS
CAMERA/POSITION
CAMERA POSITION
REMOTECONTROLUNIT
RM-P2580
ALARM
POWER
KEYLOCK
TELE
button
MENU button
CAMERA button
SET button
PAN lever
WIDE button
ENTER
button
NEAR button
FAR
button
POSITION button
AUTO
PATRO L
button
POSITION
1
POSITION
3
POSITION
2
POSITION
4
High speedHigh speed
High
speed
High
speed
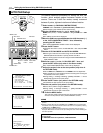
AUTO PAN / PATROL / TRACE
AUTO PAN SET..
AUTO PATROL SET..
AUTO TRACE SET..
AUTO PAN / TRACE VIDEO ..
RM.A.PAN KEY A.PAN
RM.A.PATROL KEY A. PATROL
<
MENU
>
RETURN
<
SET
>
SUB MENU
AUTO PAN/PATROL/TRACE Screen
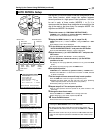
AUTO PATROL SET MODE 1
PATROL 1 HOME 10s
PATROL 2 POS 1 10s
PATROL 3 POS 2 10s
PATROL 4 POS 3 10s
PATROL 5 POS 4 10s
PATROL 6 POS 5 10s
PATROL 7 POS 6 10s
PATROL 8 POS 7 10s
<
FOCUS
>
MODE
<
ZOOM
>
PAGE
<
MENU
>
RETURN
AUTO PATROL SET MODE 1 Screen
(Example showing PATROL Nos.1 to 8)
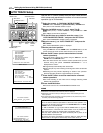
AUTO PATROL SET MODE 1
PATROL 9 POS 8 10s
PATROL 10 POS 9 10s
PATROL 11 POS 10 10s
PATROL 12 POS 11 10s
PATROL 13 POS 12 10s
PATROL 14 POS 13 10s
PATROL 15 POS 14 10s
PATROL 16 POS 15 10s
<
FOCUS
>
MODE
<
ZOOM
>
PAGE
<
MENU
>
RETURN
AUTO PATROL SET MODE 1 Screen
(Example showing PATROL Nos. 9 to 16)