


24
1-2 Mounting the Camera to the Ceiling (Continued)
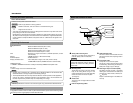
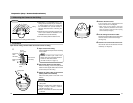
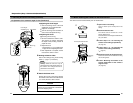
Preparation (Step 1 Connection/Installation)
CAUTION
Be sure that the dome cover is firmly at-
tached. Improper attachment could result in
the cover dropping down.
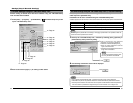
● Adjusting the focal length
1
Turn the securing screw of the focal
adjustment ring counterclockwise.
2
Adjust the focal length.
3
Turn the securing screw clockwise to
secure the focal adjustment ring.
● Adjusting the focus
Adjust using the focus ring.
1
Set the FOCUS ADJ. switch to “ON”.
The aperture is opened, decreasing
the depth of field, making it easier to
adjust the focus.
2
Adjust the focus.
* Repeat steps 1 to 3 of “Adjusting the
image size” and “Adjusting the focus”.
3
After adjustment is complete, set the
FOCUS ADJ. switch to “OFF”.
Note
Settings related to video can only be
performed using “Video setting switch” on
the camera unit. Changes cannot be
performed via the network.
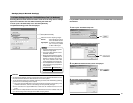
4.
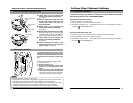
Attach the dome cover
Set the dome cover to the unit by aligning
the 3 marks on the camera and dome cover
(I, II and III). Be sure a click is heard.
3.
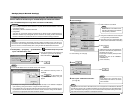
Settings related to video
Perform the settings using “Video setting
switch” (੬ page 11) if necessary.
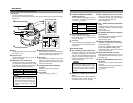
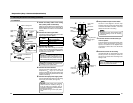
3. Adjustment of the camera’s angle of view (Continued)
Rotation levers
Focus ring
Focal length
adjustment ring
IRIS LEVEL
3.
4.
25
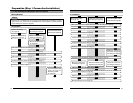
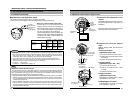
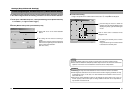
1-3 When installing the Camera to the electrical box
The camera can be mounted directly onto an electrical box.
1.
Open a hole in the ceiling.
Open a 140mm (5-1/2 inches) hole in the
ceiling.
2.
Mount the electrical box.
The camera can be mounted on a 4-inch
square electrical box.
For instructions on mounting the electrical box,
ask your dealer.
3.
Follow steps 2 to 6 of mounting the
Camera to the Ceiling (Preparations)
(
☞
page 16)
4.
Follow steps 1 to 7 of mounting the
Camera to the Ceiling (Installation)
(
☞
page 21)
5.
Mount the camera to the electrical box.
Secure the camera to the electrical box using
two mounting holes.
6.
Follow “Mounting the Camera to the
Ceiling (Adjustment of the camera’s
angle of view)”.
(
☞
page 23)
4 inch square electrical box
1.
2.
140 (5-1/2)
Mounting
holes
Mounting
holes
Screws
5.