


14
Preparation (Step 1 Connection/Installation)
1-1 The flowchart of installation work for camera
Getting Started
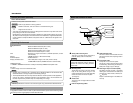
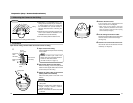
Caution
Attachment of a embedded cover in the ceiling (recess bracket) may be mandatory in certain
regions. If this is so, ensure that the embedded cover (recess bracket) is securely attached
before installing the camera.(
☞
Page16)
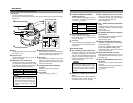
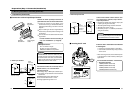
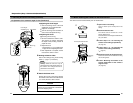
1. Preparation
Mount to the ceiling
(
☞
Page 16)
Open a hole on the
ceiling (
☞
Page 16)
Pull out the cables from the ceiling (
☞
Page 16)
Mount the electric box to
the ceiling (
☞
Page 25)
Pull out the cables aside
and mount (
☞
Page 26)
Open a hole on the
ceiling (
☞
Page 25)
Mount to the electric box
(
☞
Page 25)
Attach the safety wire to the camera unit (
☞
Page 16)
Remove the dome cover (
☞
Page 17)
Do the wiring at the end of the alarm cable (
☞
Page 17)
Insert the CF card (
☞
Page 17)
Pass the supplied cable
under the plate for
depressing cables.
(
☞
Page 26)
15
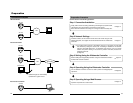
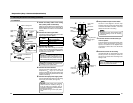
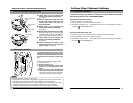
2. Installation
Mount to the ceiling
(
☞
Page 16)
Mount the electric box to
the ceiling (
☞
Page 25)
Pull out the cables aside
and mount (
☞
Page 26)
Mount the safety wire to place which is firm such as ceiling (
☞
Page 20)
Connect the input power cable (
☞
Page 20)
Connect the video signal cable (
☞
Page 20)
Connect the LAN cable (
☞
Page 20)
Connect the alarm signal cable (
☞
Page 20)
Wind the cables with tape (
☞
Page 21)
Bundle the cables and
pass them through the
wire clamp (
☞
Page 26)
Face the camera towards the direction for shooting (
☞
Page 21)
Mount the camera to
the ceiling (
☞
Page 21)
Mount the camera to the
electric box (
☞
Page 25)
Mount the camera to
the ceiling (
☞
Page 21)
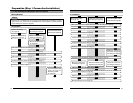
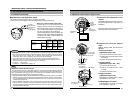
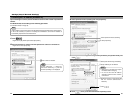
3.
Adjustment of the camera’s angle of view
Adjust the lens and camera angle (
☞
Page 23)
Mount the dome cover (
☞
Page 24)
Connect to the monitor (
☞
Page 23)