


28
2-2 Setting PC's IP Address [Windows XP]
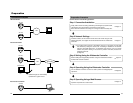
Settings (Step 2 Network Settings)
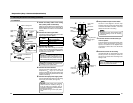
Upon installing the camera, set the IP address of the PC that is used to operate this
camera.
For Windows XP, set according to the following procedure.
(For Windows 2000,
☞
Page 30)
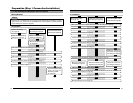
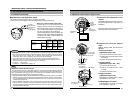
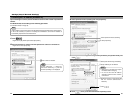
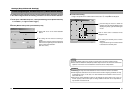
Ensure that it is selected.
1.
Click .
• Right-click on [My Network] and select [Properties].
2.
Slect the network for which the PC that operates this camera is connected to.
• Right-click to select [Properties].
Note
Under a DHCP environment and when the IP address assigned to V. Networks is already known,
it will not be necessary to perform 2-2 "Setting PC's IP Address" as the PC's IP address is
automatically acquired from the DHCP server.
Note
Select "Install (N) ..." if [Client for
Microsoft Networks] or [Internet
Protocol (TCP/IP)] is not displayed.
29
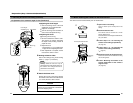
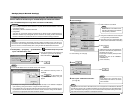
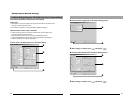
3.
Select [Internet Protocol (TCP/IP)] and click [Properties].
4.
Select [Use the following IP address], set the [IP address] and [Subnet mask] and
click
.
1
Select [Internet Protocol (TCP/IP)].
1
Select [Use the following IP address].
2
Set [IP address] to 192.168.0.3.
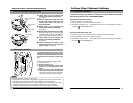
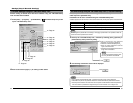
5.
Click on the [Local Area Connection Properties] screen.
2
Click [Properties].
4
Click .
3
Set Subnet mask to an appropriate value.
Ask the network administrator if
necessary.
Notes
• Make sure to note down the original
IP address before changing.
• Do not use the same IP address
elsewhere within the same network
environment.