


38
2-4 Other Settings Using the "VN-C205U Setup Tool" (3. Motion Detection Setting)
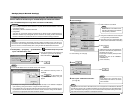
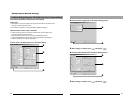
1.
Start up the "VN-C205U Setup Tool", select [Alarm Setting] and set [Motion Detection]
to "Available". (
☞
Page 44 "Other Trigger")
2.
Select [Motion Detect] under [VN-C205 Setup Tool].
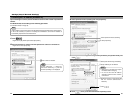
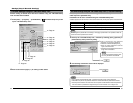
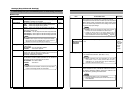
Settings (Step 2 Network Settings)
For setting the motion detection function, which activates the alarm when there is motion
in the camera image. Perform the following procedure to set area for motion detection.
1
Select "ON" to turn on the motion detection
feature.
2
For setting the time interval for defining a
motion.
When there is intensive motion throughout the
entire screen, lengthening the time interval will
help to prevent false detection.
(Set value: 0 to 3)
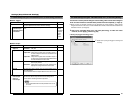
39
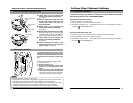
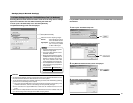
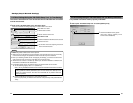
3.
Perform area setting.
Image of the position that is selected as the Fixed area in
2
of Step
2
will be displayed.
1
Click and drag the mouse to select the
detection area. To cancel the detection area
(displayed in yellow), right-click and drag the
mouse.
Area for which motion is detected will be
displayed in red.
2
For setting the sensitivity level of motion
detection.
Drag towards the right to increase and left
to decrease the sensitivity level.
Notes
● The area display position only serves as a guide. Ensure to perform operation check.
● Each screen is divided into 300 (20x15) blocks. Adjust the zoom ratio of the lens such that the
object for which motion is to be detected is at least the size of multiple blocks.
Cautions
● Flickering lights may cause false detections in motion when the camera is connected.
● When brightness varies due to the use of the auto iris function or lighting conditions, this may
be detected as motion. In this case, it is recommended that the detection time be set to a
value other than "0".
● Note that the motion detection function is not designed to prevent theft or fire. It may not
function properly under certain object or setting conditions. We shall not be responsible for
any accident or losses incurred.