14 VQT2P49 VQT2P49 15
Setting the menuSetting the clock (Continued)
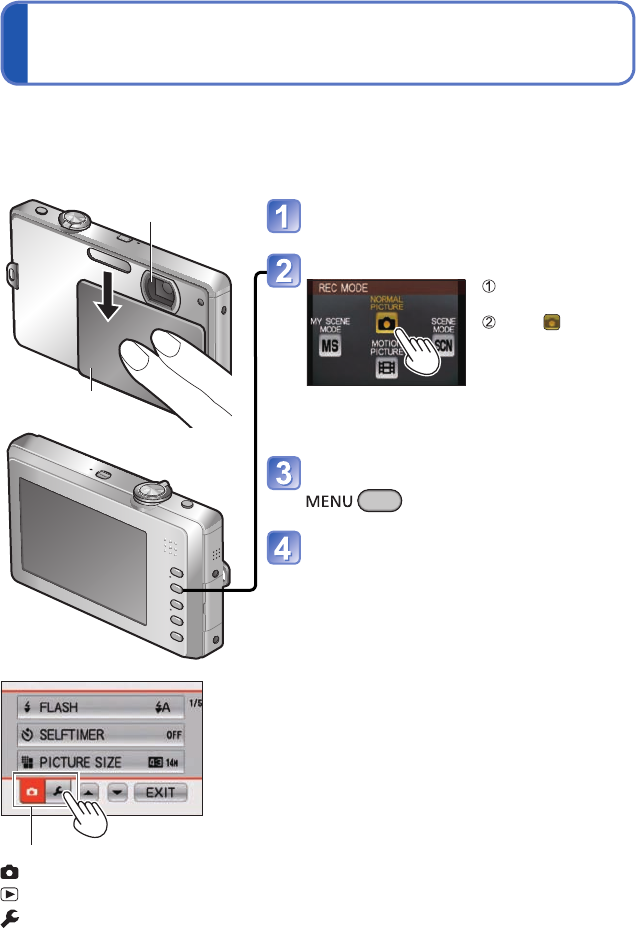
There are a number of functions you can use and settings you can change from the
various menus to help you get more use from your camera.
●
Settings display may vary according to items.
●
Menu items displayed vary according to the mode.
Touch [SET]
Touch [SET]
• To return to the previous screen
→ Touch [CANCEL]
• Turn on power again and check time
display.
(Time and date can be displayed by
pressing [DISPLAY] several times.)
To change time setting
Touch [CLOCK SET] from the [SETUP] menu to change the clock settings.
• Clock settings will be saved for approx. 3 months even after battery is removed,
provided a fully-charged battery was installed in camera for the 24 hours beforehand.
Touch [CLOCK SET] from the [REC] menu or [SETUP]
menu (→18)
Set the date and time (steps and ) (→13)
●
Failure to set the date and time will cause the date/time to be improperly printed when
printing pictures in digital photo center or when using [TEXT STAMP].
●
Year can be set between 2000 and 2099.
●
After the time has been set, the date can be printed correctly even if the date is not
displayed on the camera screen.
■
To set local time at travel
destination
[WORLD TIME] (→54)
Do not touch the lens.
Lens cover
Open the lens cover
The power is turned on.
Select [NORMAL PICTURE] Mode
Press the [MODE]
button.
Touch
([NORMAL
PICTURE] Mode)
• To display the [PLAYBACK] menu, press
the Playback button to switch to Playback
Mode.
Display the menu screen
Touch the type of menu (→16) to
switch between them
• When in Playback Mode, the [PLAYBACK]
menu is displayed in place of the [REC]
menu.
Menu type
:
[REC] menu (Recording Mode only)
:
[PLAYBACK] menu (Playback Mode only)
:
[SETUP] menu


