


26 VQT2P49 VQT2P49 27
Taking pictures with automatic settings
[INTELLIGENT AUTO] Mode
Recording Mode:
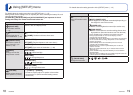
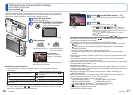
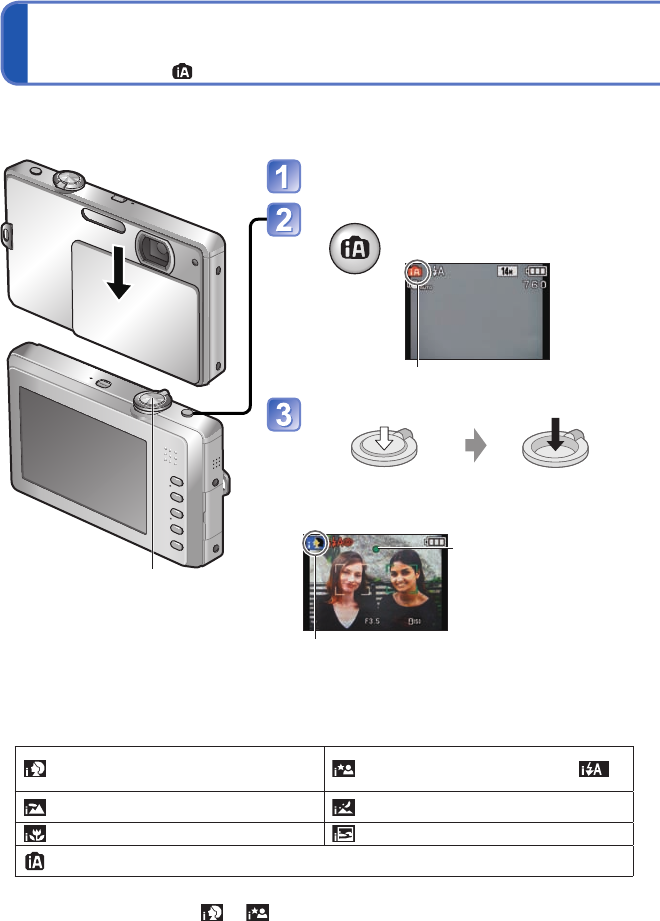
Open the lens cover
The power is turned on.
Select [INTELLIGENT AUTO] Mode
• Press again to return to the
previous Recording Mode.
Recording Mode icon (see below)
Take pictures
Press halfway
(press lightly to focus)
Press fully
(press the button all
the way to record)
Focus display
(when focus aligned:
flashing → illuminated)
The type of scene detected is indicated by a
blue icon for two seconds
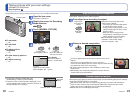
Optimum settings are made automatically from information such as ‘face,’ ‘movement,’
‘brightness,’ and ‘distance’ just by pointing the camera at the subject, meaning that clear
pictures can be taken without the need to make settings manually.
■
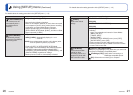
Automatic scene detection
Camera identifies scene when pointed at subject, and makes optimum settings
automatically.
[i PORTRAIT]: People are detected
[i NIGHT PORTRAIT]: People and night
scenery are detected (Only when
is selected)
[i SCENERY]: Scenery is detected
[i NIGHT SCENERY]: Night scenery is
detected
[i MACRO]: A close-up shot is detected [i SUNSET]: A sunset is detected
Reads subject movement to avoid blurring when scene does not correspond to any of the
above.
If the camera automatically identifies the scene and determines that people appear
as subjects in the picture ( or ), Face Detection is activated, and the focus and
exposure are adjusted for the recognized faces.
Shutter button
●
In addition to automatic scene detection, [ ] in [SENSITIVITY] and backlight
compensation will operate automatically.
●
The following menu items may be set in [INTELLIGENT AUTO] Mode.
• ([REC] menu): [FLASH], [SELFTIMER], [PICTURE SIZE]
∗
1
, [BURST], [COLOR
MODE]
∗
1
• ([SETUP] menu
∗
2
): [CLOCK SET], [WORLD TIME], [BEEP]
∗
1
, [LANGUAGE],
[STABILIZER DEMO.]
∗
1
Items that may be set differ from other Recording Modes.
∗
2
Other items in the [SETUP] menu will reflect settings made in other Recording
Modes.
●
According to the following conditions, different scene types may be determined for the
same subject.
Face contrast, conditions of subject (size, distance, coloring, contrast, movement),
zoom ratio, sunset, sunrise, low brightness, jitter
●
If desired scene type is not selected, we recommend manually selecting the appropriate
Recording Mode. (Scene Mode: (→42))
●
Backlight compensation
Backlight refers to the light that shines from behind the subject. When this occurs, the
subject appears darker, and so backlighting is automatically corrected by increasing the
brightness of the entire image.
●
We recommend using a tripod and the self-timer with [i NIGHT SCENERY] and
[i NIGHT PORTRAIT].
●
When jitter is small (e.g. using tripod) with [i NIGHT SCENERY], shutter speed can
reach a maximum of 8 seconds. Do not move the camera.
●
The settings for the following functions are fixed.
• [AUTO REVIEW]: [2 SEC.] • [AUTO POWER OFF]: [5 MIN.]
• [WHITE BALANCE]: [AWB] • [STABILIZER]: [AUTO]
• [AF MODE]: (Face Detection)
∗
3
• [AF ASSIST LAMP]: [ON]
∗
3
(9-area-focusing) when face cannot be recognized
●
The following functions cannot be used.
[EXPOSURE], [DIGITAL ZOOM]
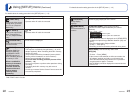
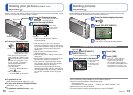
■
To use flash
Touch on the Quick menu (→17)
• You can also set by touching [FLASH] in the [REC]
menu
Touch
• If you are not going to use flash, touch .
• Touch [EXIT] to return to the original screen.
• When
is used, , (Auto/red-eye reduction),
(Slow sync./red-eye reduction) and (Slow sync.)
are selected automatically according to the subject type and
brightness. (For details (→37))
•
and indicate that digital red-eye correction is
activated.
• The shutter speed is slower in
and .