


2 VQT2P49 VQT2P49 3
Quick start guide Contents
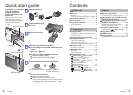
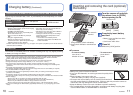
The battery is not charged
when the camera is
shipped. Charge the
battery and set the clock
before use.
When you do not use the
card (optional), you can
record or play back pictures
on the built-in memory
(→12).
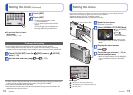
Charge the battery
Insert the battery and
the card
Open the lens cover
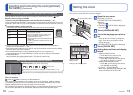
Select the desired Recording Mode
■
To use settings automatically selected by the
camera
Press the button.
■
To select the Recording Mode manually
Press the [MODE] button.
Touch the desired Recording Mode.
Press the shutter button and take pictures
Press halfway
(press lightly to focus)
Press fully
(press the button all
the way to record)
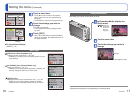
■
To play back the pictures
Press the Playback button.
Select the picture you want to view.
• You can also go to the next or previous picture
by dragging the center of the screen. (→32)
Playback button
button
[MODE] button
Do not touch the
lens.
Lens cover
Before use
Before use ..............................................5
Read first .......................................................5
To prevent damage, malfunctions, and faults
...5
Standard Accessories ...........................6
Names of parts.......................................7
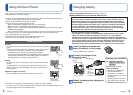
Using the Touch Panel .........................8
Touch operations ..........................................8
Preparations
Charging battery ....................................9
Guidelines for number of recordable pictures
and recording time
.......................................10
Inserting and removing the card
(optional)/the battery ........................... 11
Picture save destination
(cards and built-in memory) ........................12
Remaining battery and memory capacity ....12
Setting the clock ..................................13
To change time setting ................................14
Setting the menu .................................15
Menu type ...................................................16
Using Quick menu .......................................17
Using [SETUP] menu .......................18
[CLOCK SET]/ [WORLD TIME]/
[TRAVEL DATE]/ [BEEP]/
[VOLUME]..............................................18
[LCD MODE]/ [FOCUS ICON] ...........19
[AUTO POWER OFF]/
[AUTO REVIEW] ....................................20
[RESET]/ [USB MODE] .....................21
[VIDEO OUT]/ [TV ASPECT]/
[VERSION DISP.]/ [FORMAT] ..........22
[LANGUAGE]/ [DEMO MODE] ........23
Basics
Sequence of Recording ......................24
Convenient ways to turn the power on ........25
Taking pictures with automatic settings
[INTELLIGENT AUTO] Mode
................26
Taking pictures with your own settings
[NORMAL PICTURE] Mode
..................28
Align focus for desired composition ............29
Direction detection function .........................29
Taking pictures with zoom ..................30
Enlarging further [DIGITAL ZOOM] .......31
Viewing your pictures
[NORMAL PLAY] ..................................32
Deleting pictures .................................33
To delete multiple (up to 50) or all pictures
... 33