


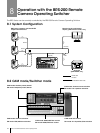
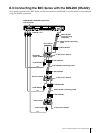

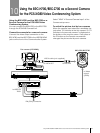

38
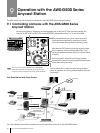
Operation with the AWS-G500/G500HD Anycast Station
9.3 Operating the PGM and NEXT Selection buttons from
the RM-BR300
When you connect the RM-BR300 to the FACTORY USE connector on the AWS-G500, you can
perform switching for the PGM and NEXT selection buttons from the RM-BR300.
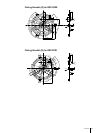
Refer to the following diagram to prepare the cables.
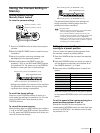
Sample Circuit diagram
For details, consult your dealer or your Sony service representative.
• Pull-up of all signal lines is necessary.
• Set TRIGGER to LOW LEVEL (this section is made in Remote Switching in the Video utility)
• On the RM-BR300, set the TALLY/CONTACT switch to CONTACT.
Caution
1 Connect the RM-BR300 to the FACTORY USE
connector.
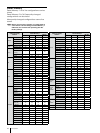
2 Press the MENU button.
3 In the top menu, select [Video Utility]
4 (1) select [Remote Switching], and confirm;
(2) select the buttons to be controlled by the
RM-BR300, and confirm.
The functions of the setting items are as follows.
[Off]: Disables switching from the RM-BR300.
[PGM]: Enables switching operations for PGM
selection buttons 1 to 6 from the RM-BR300.
[NEXT]: Enables switching operations for NEXT
selection buttons 1 to 6 from the RM-BR300.
Use this to perform VISCA camera control.
When the KEY button is lit, you can make
key source selections.
Connect the RM-BR300 before configuring this
setting.
Caution
When [Remote Switching] is
enables, the following icon
appears.
Example: When [PGM] is
selected.
Note
5 (1) Select [Trigger], and confirm;
(2) select an input level, and confirm.
The functions of the setting items are as follows.
[Low Level]: Triggers remote switching when input
levels become low.
[High Level]: Triggers remote switching when input
levels become high.
6 Press the MENU button to close the menu.
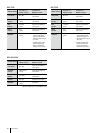
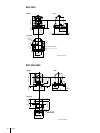
TALLY/CONTACT connector
Open-collector output
FACTORY USE connector
TTL output
(1) (2)
Icon
(1) (2)