


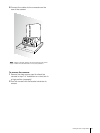


62
Installing the Camera in a High Position
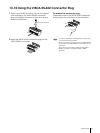
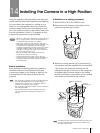
4 Attach the ceiling bracket (B) to a shelf, etc. on
which the camera is to be installed. Use four
screws (not supplied) appropriate for the
materials of the shelf, etc. Align the hole on the
ceiling bracket (B) in the direction where the
front of the camera will be positioned later.
5 Attach the other end of the wire rope to the
material near the shelf, etc. Use an M5 (3/16
inch) hexagon socket head cap screw (not
supplied). Attach the wire rope to the material
independent of the shelf, etc. where the ceiling
bracket (B) is attached.
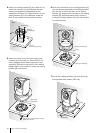
6 Insert the protrusions on the ceiling bracket (A)
into the spaces prepared in the ceiling bracket
(B) with the a hole in the front of the ceiling
bracket (A) aligned with the hole on the ceiling
bracket (B), and temporarily attach them by
turning the ceiling bracket (A) with the camera
counterclockwise.
Screws (4)
Ceiling
bracket (B)
Hole for
connecting cables
Shelf, etc.
Wall
hole
Wire rope
(supplied)
M5 (3/16 inch) hexagon socket
head cap screw
Ceiling bracket (A)
Ceiling bracket (B)
Align.
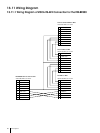
7 Secure the ceiling brackets (A) and (B) using
the supplied three screws (3M3 × 8).
M3 x 8
(supplied)