


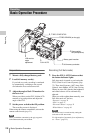

Changing Basic Settings
31
Recording
Using the Direct menu
When you press the DISPLAY button (page 13),
the current adjustment mode and color
temperature are displayed on the screen (page
16).
ATW: ATW mode
W:A: Memory A mode
W:B: Memory B mode
W:P: Preset mode
W:NS: NightShot mode “On”
When the Direct menu (page 17) is in All mode,
you can select from among ATW, W:A, W:B, and
W:P.
When the Direct menu is in Part mode, you can
switch between ATW and the mode set with the
WHITE BAL switch.
When W:NS is displayed, switching via the
Direct menu is not possible.
Executing Auto White Balance
1 To store the adjustment value in
memory, select Memory A or Memory
B mode.
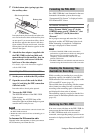
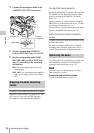
2 Place a white subject under the same
lighting condition and zoom in on it so
that a white area is obtained on the
screen.
3 Adjust the brightness.
Adjust Exposure as instructed in “Adjusting
the brightness manually (page 33)” below.
4 Press the WHITE BAL button (page
13).
Auto white balance adjustment begins.
When you execute the adjustment in a memory
mode, the adjusted value is stored in memory (A
or B) selected in step 1.
When you execute the adjustment in ATW mode,
adjustment in ATW is resumed.
Notes
• Auto white balance adjustment cannot be performed
when in Preset mode.
• When NightShot mode is set to “On,” auto white
balance cannot be performed.
• If auto white balance adjustment fails, an error
message is displayed on the screen for approximately
3 seconds. If the error message continues to be
displayed after several attempts, consult your Sony
service representative.
During recording, various markers and zebra
patterns can be inserted into the image on the
LCD monitor/EVF screen.
This does not affect recording signals.
Displaying the Markers
Use “Marker” (page 78) in the LCD/VF SET
menu.
Displaying the Zebra Patterns
A zebra pattern(s) can be inserted to the picture
on LCD monitor/EVF screen to check the
appropriate luminance level.
Pressing the ZEBRA button (ASSIGN 1 button)
(page 13) turns the zebra pattern-indication on/
off.
Changing the zebra pattern
Using “Zebra” (page 78) in the LCD/VF SET
menu, you can change the zebra pattern to be
displayed.
Recording with Fixed Gain
You can change the gain of the video amplifier.
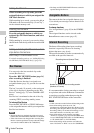
Selecting the gain with the switch
The gain value at each of the GAIN switch (page
13) positions set at the factory are as follows:
L: 0 dB
M: 9 dB
H: 18 dB
These values can be changed in the range of –3 db
to +18 db, using the CAMERA SET menu’s Gain
Setup menu (page 70).
Note
You cannot select a fixed gain when AGC mode is set to
On.
Selecting gain using the Direct menu
When you press the DISPLAY button (page 13),
the current gain value is displayed on the screen
(page 16).
When the Direct menu is in All mode, you can
change the gain in steps of 3 dB with the Direct
menu.
Markers/Zebra Patterns
Gain