


Changing Basic Settings
34
Recording
MF Assist function
If you set “MF Assist” (page 70) in the CAMERA
SET menu to “On” to enable the MF Assist
function, auto focusing is engaged when you stop
rotating the lens operation ring, performing fine
focus adjustment for the subject in the center of
the screen. When the fine adjustment is
completed, automatic focusing with the MF
Assist function is terminated.
You can also enable the MF Assist function via
the Direct menu (page 17). When you press the
DISPLAY button, the selected focus mode is
displayed on the screen (page 16). The Direct
menu cannot be selected in a mode other than MF
mode.
Adjusting in AF Mode
When you set the FOCUS switch (page 13) to
AUTO, the camcorder is set to AF mode, and
focus is always adjusted automatically.
Set “Steady Shot” (page 74) in the CAMERA
SET menu to “On.”
When you press the DISPLAY button, the setting
of the Steady Shot function is displayed on the
screen (page 16). The Steady Shot function can
also be activated via the Direct menu (page 17).
Two operation modes are provided for Steady
Shot: Normal mode and Wide mode (for a wide-
conversion lens).
When you attach the optional VCL-HG0737K
wide-conversion lens, be sure to set “Wide
Conversion” (page 73) in the CAMERA SET
menu to “On.”
Note
If the camcorder is fixed to a tripod, etc., for stability,
deactivate the Steady Shot function.
NightShot is convenient for recording in dark
areas.
Set “Setting” in “NightShot” (page 74) in the
CAMERA SET menu to “On.”
You can also assign NightShot to an assignable
button (page 38) to change value of “Setting” to
“On”/“Off.”
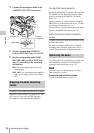
To emit an infrared line
Set “NS Light” in “NightShot” (page 74) in the
CAMERA SET menu to “Auto” to automatically
emit an infrared line from the IR transmitter (page
12).
Notes
• Avoid covering the IR transmitter with your finger
when using the NightShot infrared line
• The infrared line can reach to about 3 meters.
• If the image is out of focus, adjust the focus manually.
• Using this in a bright area may damage the camcorder.
• When you set the camcorder’s power switch to “OFF,”
NightShot is automatically disabled.
Setting the shutter speed according to
the power-supply frequency
Activate the electronic shutter (page 32) and set
the shutter speed according to the power supply
frequency.
When the frequency is 50 Hz
Set the shutter speed to 1/50 or 1/100 seconds.
When the frequency is 60 Hz
Set the shutter speed to 1/60 or 1/120 seconds.
Using the Flicker-Reduction function
Set “Mode” in “Flicker Reduce” (page 71) in the
CAMERA SET menu to “Auto” or “On” and set
“Frequency” to the power-supply frequency (50
Hz or 60 Hz).
Note
If the frame rate selected for recording is close to the
power-supply frequency, flicker may not be reduced
sufficiently even if you activate the Flicker-Reduction
function. In such cases, use the electronic shutter.
Steady Shot
Note on use of a wide-conversion lens
NightShot
Flickers