


Useful Functions
38
Recording
Adding the OK mark
When recording of a clip ends, press the
assignable button to which you assigned the
OK Mark function.
While standing by to record, you can also add an
OK mark to the last-recorded clip (“Last Clip”)
on the selected memory card.
Deleting the OK mark
Press the assignable button to which you
assigned the OK Mark function, and select
“Execute.”
While standing by to record, you can also delete
the OK mark from the clip with the last-added OK
mark.
Adding or deleting the OK mark to or from
clips before the last one
Make changes via the thumbnail screen.
For details on making settings, see “Adding/Deleting
the OK Mark (FAT HD Mode Only)” (page 59).
You can review the last recorded clip on the
screen (Rec Review).
Press the REC REVIEW button (page 14)
after recording is finished.
If the Rec Review function is assigned to an
assignable button (page 38), you can also use that
button.
The last 3 seconds, 10 seconds, or the entire part
of the clip is displayed, depending on the “Rec
Review” setting (page 72) in the CAMERA SET
menu.
Rec Review is terminated at the end of the clip,
resuming STBY (recording standby) status.
To interrupt Rec Review
Press the REC REVIEW or STOP/CAM button
or the assignable button to which you assigned the
Rec Review function.
Notes
• During Rec Review playback, the playback control
buttons other than the STOP/CAM button are disabled.
• If the video format was changed after recording, Rec
Review cannot be performed (except when the change
was from SP 1440/23.998P to SP 1440/59.94i).
• The Setup and PICTURE PROFILE menus cannot be
operated during Rec Review.
The camcorder has four assignable buttons (page
13) to which you can assign various functions for
convenience.
To change functions
Use “Assign Button” (page 83) in the OTHERS
menu.
The assigned functions can be viewed on the
Button/Remote status screen (page 65).
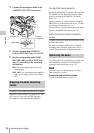
The Interval Recording (time-lapse recording)
function is especially effective for shooting
objects that move very slowly.
The specified number of frames are automatically
recorded at the specified intervals.
It is recommended to fix the camcorder to a tripod
or equivalent and use the IR Remote Commander
to start/stop recording rather than pressing the
REC START/STOP button of the camcorder.
Notes
• Audio cannot be recorded in Interval Recording mode.
• Interval Recording cannot be set to “On”
simultaneously with Frame Recording, Picture Cache
Recording, Slow & Quick Motion, or Clip Continuous
Recording. When you set Interval Recording to “On,”
these other functions are forcibly set to “Off.”
• Interval Recording mode cannot be used when
“Format” in “System” (page 85) in the OTHERS menu
is set to “HD420 HQ/720/23.98P” (in UDF HD Mode)
or “SP 1440/23.98P” (in FAT HD Mode).
• Interval Recording mode cannot be used when the
items “DVCAM” or “HDV” are set for “SDI/HDMI/
Rec Review
Assignable Buttons
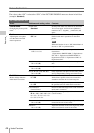
Interval Recording
Number of frames for one recording session
(Number of Frames)
Recording interval (Interval Time)