


Useful Functions
42
Recording
In UDF HD Mode or FAT HD Mode, an image
(still picture) of a recorded clip can be
temporarily superimposed on the current camera
picture, permitting you to easily align images for
your next recording.
To use the Freeze Mix function
While standing by to record, assign the Freeze
Mix function to one of the assignable buttons
(page 38).
Superimposing a Freeze Mix image
While recording or reviewing images by pressing
the REC REVIEW button, press the ASSIGN
button to which you assigned “Freeze Mix” at the
image with which you want to align. The image is
displayed as a still picture over the current camera
picture.
Canceling Freeze Mix status
You can cancel it with the ASSIGN button to
which you assigned “Freeze Mix” or the REC
START/STOP button.
When you cancel Freeze Mix status by pressing
the ASSIGN button, the normal camera picture is
displayed.
When you cancel Freeze Mix status by pressing
the REC START/STOP button, normal recording
begins.
Notes
• The Freeze Mix function cannot be used in SD Mode.
• Freeze Mix cannot be used when “Format” in
“System” (page 85) in the OTHERS menu is set to
“HD420 HQ/720/23.98P” (in UDF HD Mode) or “SP
1440/23.98P” (in FAT HD Mode).
• If the “Format” setting of the recorded picture and the
current camera picture differ, the Freeze Mix display
cannot be achieved.
• The Freeze Mix display cannot be obtained in Slow &
Quick Motion mode or Slow Shutter mode.
• You cannot operate the Setup menus and PICTURE
PROFILE menu in Freeze Mix status.
You can customize the picture quality, depending
on the conditions or circumstances of recording,
and store settings as a picture profile, enabling
you to recall the profile as necessary.
Six different picture profiles (PP1 to PP6) can be
stored in memory.
The same standard (reference) values are
registered to six picture profiles at the factory as
those specified for the Picture Profile Off status.
Note
The picture profiles can be operated only while standing
by to record. They cannot be operated from the
thumbnail screen.
Registering the customized settings as a
Picture Profile
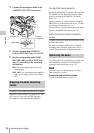
1 Set the power switch (page 11) to ON to
turn on the camcorder.
2 Press the PICTURE PROFILE button
(page 13).
The PICTURE PROFILE menu is displayed.
3 Using the up/down/left/right buttons or
the jog dial, select “SEL,” then press the
SEL/SET button or the jog dial.
4 Select the number of the picture profile
to register from the list, then press the
SEL/SET button or the jog dial.
5 Use the up/down buttons or the jog dial
to select “SET,” then press the SEL/
SET button or the jog dial.
6 Make each setting (page 44).
7 When the settings have been made,
press the PICTURE PROFILE button.
Selecting a registered Picture Profile
Once you store a picture profile, you can recall
the picture quality registered in the picture
profile.
1 While standing by to record, press the
PICTURE PROFILE button (page 13).
The PICTURE PROFILE menu is displayed.
Freeze Mix: Image Alignment Picture Profiles