


Others
Assigning the IP Address to the Camera Using ARP Commands
112
Assigning the IP
Address to the Camera
Using ARP Commands
This section explains how to assign an IP address to the
camera using ARP (Address Resolution Protocol)
commands without using the supplied SNC toolbox.
Note
When you turn on the camera, execute the ARP and
PING commands within 5 minutes. Also when you
restart the camera, execute the operation within 5
minutes.
1
Open the command prompt on the computer.
2
Enter the IP address and the MAC address of the
camera to assign a new IP address, using the
following ARP commands.
Example:
3
When the following line is displayed on the
command prompt, hold down Ctrl and press C.
Display stops.
You will normally receive a reply after about 5
repetitions of “Request time out.”
4
Wait until the execution of PING finishes, then
input the following code.
Note
If you do not receive a reply, check the following:
– Did you enter the ARP commands within 5 minutes
after it was turned on?
If not, turn off the camera and restart the operation.
– Is the NETWORK indicator on the camera flashing?
If the indicator goes off, the network connection has a
problem. Connect the network correctly.
– Did you enter the IP address previously used for
another device?
Assign a new IP address to the camera.
– Do the computer and the camera have the same
network address?
If not, set the same network address on the computer
and the camera.
Using the SNMP
This unit supports SNMP (Simple Network
Management Protocol). You can read MIB-2 objects
using software such as SNMP manager software. This
unit also supports the coldStart trap which occurs when
the power is turned on or the unit restarts, and the
Authentication failure trap, which informs of any illegal
access using SNMP.
Using CGI commands, you can set the community name
and access limitation, host to send traps, and some MIB-
2 objects. To allow these settings, you need
authentication by the camera administrator.
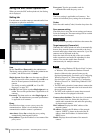
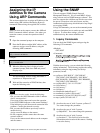
1. Inquiry Commands
You can check the SNMP Agent settings using the
following CGI commands.
<Method>
GET, POST
<Command>
(JavaScript parameter format)
(standard format)
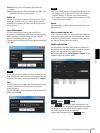
With the above inquiry, you can obtain the following
setting information. The following explains the setting
information using the inqjs=snmp (JavaScript
parameter) format.
var sysDescr=“SNC-RH124”, “SNC-RH164”,
“SNC-RS46” (SNC-RS46N/P), “SNC-RS44”
(SNC-RS44N/P), “SNC-RS86” (SNC-RS86N/P),
“SNC-RS84” (SNC-RS84N/P) ...1
var sysObjectID=“1.3.6.1.4.1.122.8501” ...2
var sysLocation=“” ...3
var sysContact=“” ...4
var sysName=“” ...5
var snmpEnableAuthenTraps=“1” ...6
var community=“public,0.0.0.0,read,1” ...7
var community=“private,192.168.0.101,read,2” ...8
var trap=“public,192.168.0.101.1” ...9
1 describes the case of “mib-2.system. sysDescr.0”.
You cannot change this parameter.
2 describes the case of “mib-2.system.
sysObjectID.0”. You cannot change this parameter.
3 describes the case of “mib-2.system.
sysLocation.0”. This field is used to describe
information on the location of this camera. Nothing
is set at the factory.
arp -s <Camera's IP address> <Camera's MAC address>
ping -t <Camera's IP address>
arp -s 192.168.0.100 08-00-46-21-00-00
ping -t 192.168.0.100
Reply from 192.168.0.100:bytes=32 time...
arp -d 192.168.0.100