


131
1
2
3
4
5
6
7
8
9
Cover
PreliminaryNotesand
LegalInformation
Contents:
BasicOperations
AdvancedGuide
CameraBasics
SmartAuto
Mode
OtherShooting
Modes
PMode
Wi-FiFunctions
SettingMenu
Accessories
Appendix
Index
BasicGuide
PlaybackMode
Cover
AdvancedGuide
9
Appendix
Subjectsinshotslooktoodark.
• Set the ash mode to [h] (=
68).
• Adjust brightness by using exposure compensation (=
59).
• Adjust contrast by using i-Contrast (=
61, 84).
• Use AE lock or spot metering (=
59, 60).
Subjectslooktoobright,highlightsarewashed-out.
• Set the ash mode to [!] (=
41).
• Adjust brightness by using exposure compensation (=
59).
• Use AE lock or spot metering (=
59, 60).
• Reduce the lighting on subjects.
Shotslooktoodarkdespitetheashring(=
36).
• Shoot within ash range (=
146).
• Increase the ISO speed (=
60).
Subjectsinashshotslooktoobright,highlightsarewashed-out.
• Shoot within ash range (=
146).
• Set the ash mode to [!] (=
41).
Whitedotsorsimilarimageartifactsappearinashshots.
• This is caused by light from the ash reecting off dust or airborne particles.
Shotslookgrainy.
• Lower the ISO speed (=
60).
Subjectsareaffectedbyred-eye(=
43).
• Set [Red-Eye Lamp] to [On] (=
46) to activate the red-eye reduction lamp
(=
3) in ash shots. Note that while the red-eye reduction lamp is on (for about
one second), it is not possible to shoot, because the lamp is counteracting red-eye.
For best results, have subjects look at the red-eye reduction lamp. Also try increasing
the lighting in indoor scenes and shooting at closer range.
• Edit images using red-eye correction (=
85).
Recordingtothememorycardtakestoolong,orcontinuousshootingisslower.
• Use the camera to perform low-level formatting of the memory card (=
114).
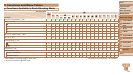
ShootingsettingsorFUNC.menusettingsarenotavailable.
• Available setting items vary by shooting mode. Refer to “Functions Available in Each
Shooting Mode”, “FUNC. Menu”, and “Shooting Menu” (=
138 – 141).
Shooting Movies
Theelapsedtimeshownisincorrect,orrecordingisinterrupted.
• Use the camera to format the memory card, or switch to a card that supports high-
speed recording. Note that even if the elapsed time display is incorrect, the length of
movies on the memory card corresponds to the actual recording time (
=
113, 146
).
[ ]isdisplayedandshootingstopsautomatically.
The camera’s internal memory buffer lled up as the camera could not record to the
memory card quickly enough. Try one of the following measures.
• Use the camera to perform low-level formatting of the memory card (=
114).
• Lower the image quality (=
44).
• Switch to a memory card that supports high-speed recording (=
146).
Zoomingisnotpossible.
• Zooming is not possible when shooting movies in [ ] mode (=
51).
Playback
Playbackisnotpossible.
• Image or movie playback may not be possible if a computer is used to rename les or
alter the folder structure. Refer to the Software Guide (=
18, 22) for details on
folder structure and le names.
Playbackstops,oraudioskips.
• Switch to a memory card that you have performed low-level formatting on with the
camera (=
114).
• There may be brief interruptions when playing movies copied to memory cards that
have slow read speeds.
• When movies are played on a computer, frames may be dropped and audio may skip
if computer performance is inadequate.
Soundisnotplayedduringmovies.
• Adjust the volume (=
71) if you have activated [Mute] (=
111) or the sound in
the movie is faint.
• No sound is played for movies shot in [
] mode (=
51) because audio is not
recorded in this mode.
Memory Card
Thememorycardisnotrecognized.
• Restart the camera, with the memory card in it (=
12).