


83
1
2
3
4
5
6
7
8
9
Cover
PreliminaryNotesand
LegalInformation
Contents:
BasicOperations
AdvancedGuide
CameraBasics
SmartAuto
Mode
OtherShooting
Modes
PMode
Wi-FiFunctions
SettingMenu
Accessories
Appendix
Index
BasicGuide
PlaybackMode
Cover
5
AdvancedGuide
PlaybackMode
5 Reviewthenewimage.
Press the <n> button. [Display new
image?] is displayed.
Press the <q><r> buttons to choose
[Yes], and then press the <m> button.
The saved image is now displayed.
•Editing is not possible for images saved as [ ] in step 3.
• Images cannot be resized to a higher resolution.
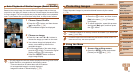
Still Images
Cropping
You can specify a portion of an image to save as a separate image le.
1 Choose[Cropping].
Press the <n> button, and then
choose [Cropping] on the [1] tab
(=
32).
2 Chooseanimage.
Press the <q><r> buttons to choose an
image, and then press the <m> button.
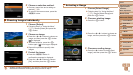
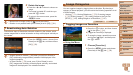
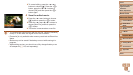
3 Adjustthecroppingarea.
A frame is displayed around the portion of
the image to be cropped.
The original image is shown in the upper
left, and a preview of the image as
cropped is shown in the lower right.
To resize the frame, move the zoom
lever.
To move the frame, press the
<o><p><q><r> buttons.
To change the frame orientation, press
the <m> button.
Press the <n> button.
4 Saveasanewimageand
review.
Follow steps 4 – 5 in “Resizing Images”
(=
82).
•Editing is not possible for images shot at a resolution of [ ]
(=
43) or resized to [ ] (=
82).
• Images supported for cropping will have the same aspect ratio after cropping.
• Cropped images will have a smaller resolution than uncropped images.
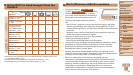
Resolution After Cropping
Preview of Image After Cropping
Cropping Area