


Troubleshooting
67
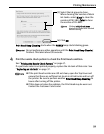
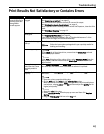
Print Results Not Satisfactory or Contains Errors
Problem Possible Cause Try This
Ink does not eject
properly/Printing is
Blurred/Colors are
Wrong/White
Streaks appear
Print Head nozzles are
clogged
Open the Top Cover and check if all ink tank lamps are lit.
See “Replacing an Ink Tank” on page 37.
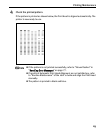
Print the nozzle check pattern to check for uneven ink output.
See “Printing the Nozzle Check Pattern” on page 47.
When a specific color is missing from the nozzle check pattern, clean the Print
Head.
See “Print Head Cleaning” on page 52.
Print Head is
misaligned
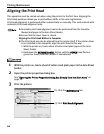
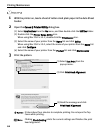
Perform Automatic Print Head Alignment.
See “Aligning the Print Head” on page 60.
If this does not solve the problem, refer to “Routine Maintenance” of the
User’s Guide
and align the Print Head manually.
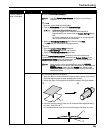
Paper loaded wrong
side up
Check the print side of the paper.
Follow the instructions packaged with your specialty media for
loading and handling.
Incorrect paper type
On the Main tab of the printer driver, ensure that the Media Type selected
matches the paper loaded.
In the Print dialog box of the printer driver, select Quality & Media from the
pop-up menu, and then ensure that the Media Type selected matches the
paper loaded.
Glossy photo paper
other than the Canon
specialty media is
used
Select Other Photo Paper from
Media Type. It may resolve the problem. Load
one sheet at a time and remove each sheet as soon as it is printed.
Print Quality is not set
properly
Be sure to set the Print Quality setting to High in Windows, or Fine in
Macintosh.
1. Open the printer properties dialog box.
2. On the Main tab, click High for the Print Quality setting.
When you cannot choose the High setting or when the print quality does
not improve, select Custom, click Set and then adjust the Quality bar for
higher print quality.
1. Open the Print dialog box.
2. Select Quality & Media from the pop-up menu and then click Detailed
Setting.
3. Drag the Print Quality slide bar to the Fine end.