


VB Administration Tools
4
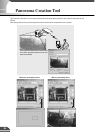
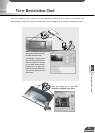
View Restriction Tool
6
7
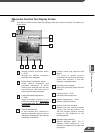
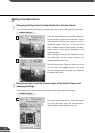
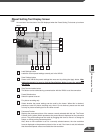
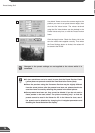
Apply the view restriction
View restriction settings are applied when this item is selected.
View Restriction Value Input boxes and Get Value button
The view restriction settings can be edited by entering values in the View Restriction Value
Input boxes. When the Get Value button is clicked, current angle of the camera selected
with this tool can be retrieved and reflected in each setting value listed below.
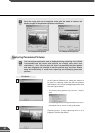
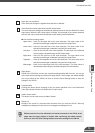
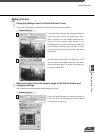
● View restriction setting values
Upper value ...Value for the upper limit of the view restriction. The upper value of the
selected camera angle is obtained using the Get Value button.
Lower value ...Value for the lower limit of the view restriction. The lower value of the
selected camera angle is obtained using the Get Value button.
Left value .......Value for the left limit of the view restriction. The left value of the selected
camera angle is obtained using the Get Value button.
Right value ....Value for the right limit of the view restriction. The right value of the
selected camera angle is obtained using the Get Value button.
Telephoto ......Value for the telephoto limit of the view restriction. The zoom value of the
selected camera angle is obtained using the Get Value button.
Wide-angle ....Value for the wide-angle limit of the view restriction. The zoom value of
the selected camera angle is obtained using the Get Value button.
Apply button
Sends to the VB150 the current view restriction settings edited with this tool. You can go
to the next camera settings by clicking this Apply button. At this stage, the edited settings
are not yet saved to the VB150. Be sure to click the Save Settings button to save the
settings to the VB150.
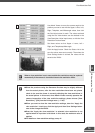
Preview button
Clicking this button allows checking of the set values specified in the View Restriction
Value Input boxes with the View Restriction Preview frame.
Admin Viewer button
This button can be used to start up Admin Viewer.
Status List
Displays the results of communication between this tool and the VB150. Warning
messages are displayed in blue and error messages are displayed in red.
9
10
11
c
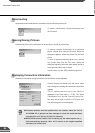
Note
Edited content will not be reflected in the viewer accessed to the VB150 at the
stage when the Apply button is clicked. After confirming the edited content,
be sure to click the Save Settings button to save the settings to the VB150.
8
72