


138
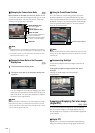
[Fixed at Infinity] : You can set the focus so that it is
fixed near infinity.
Setting the Exposure
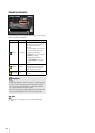
(1) Exposure Mode
Select from [Auto], [Manual], [Auto (Flickerless)] or
[Auto (Shutter-priority AE)].
If [Auto] is selected for [Day/Night] under [Camera] in
the Setting page (p. 53), select [Auto], [Auto
(Flickerless)] or [Auto (Shutter-priority AE)].
For an explanation on each item set in the exposure
mode, see the setting page (p. 51).
(2) [Exposure Compensation]
When [Auto], [Auto (Flickerless)] or [Auto (Shutter-
priority AE)] is selected for the exposure mode, the
exposure compensation value desired can be
selected from nine levels (-4 to +4) using the slider.
To darken the image, select a negative value. To
brighten the image, select a positive value.
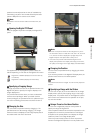
(3) [Metering Mode]
When [Auto], [Auto (Flickerless)] or [Auto (Shutter-
priority AE)] is selected for the exposure mode, the
metering mode can be selected from [Center-
Weighted], [Average] or [Spot].
[Center-Weighted]
The entire screen is metered by focusing on the
center of the screen.
Even when slightly darker/brighter areas are present
on the periphery of the screen, an appropriate
exposure can be achieved for the subject near the
center.
Use this mode if the subject is positioned near the
center of the screen.
[Average]
The entire screen is metered by averaging.
A stable exposure can be achieved even in a
capture environment where there are notable
brightness differences within the screen.
Use this mode to stabilize the exposure in locations
where vehicles or people are moving.
[Spot]
The center of the screen is metered.
An appropriate exposure can be achieved for the
subject at the center of the screen regardless of the
brightness/darkness on the periphery of the screen.
Use this mode if you want to adjust the exposure to
the center of the screen because the subject is
receiving a spotlight or backlight, etc.
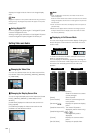
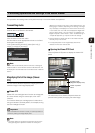
(4) [Shutter Speed]
When [Manual] or [Auto (Shutter-priority AE)] is
selected for the exposure mode, select the shutter
speed desired. If [Manual] is selected, set the shutter
speed in the range of [1/1 sec] to [1/16000 sec] from
a pull-down menu. If [Auto (Shutter-priority AE)] is
selected, set the shutter speed in the range of [1/2
sec] to [1/16000 sec] from a pull-down menu.
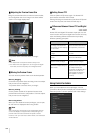
(5) [Aperture]
If [Manual] is selected for the exposure mode, set a
desired aperture value.
Moving the slider to the left closes the aperture and
darkens the image. Moving the slider to the right
opens the aperture and brightens the image.
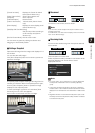
(6) [Gain]
If [Manual] is selected for the exposure mode, set a
desired gain value.
Moving the slider to the left decreases the gain
(sensitivity to brightness) and darkens the image.
Moving the slider to the right increases the gain and
brightens the image.
Important
• If it is set in the Admin Viewer, the same focus mode will
occur in the viewers of other users also.
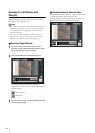
• Depending on the lighting used, focus may
not be maintained when switching between [Day Mode] and
[Night Mode]. Focus when switching Day/Night Mode can be
set in the [Day/Night Mode Focus Settings] panel in the
Admin Viewer (p. 139).
• Setting the shutter speed at [1/1 sec] in manual exposure
(p. 138) will disable the [Auto] and [One-shot AF] focus
modes in camera control. Switch the focus to [Manual] and
adjust it to your subject.
• Refer to the notes on p. 52 for focus ranges.
• Changes to focus mode in the Admin Viewer will not be
reflected in the settings on the setting page.
• Note that if you set the focus manually it will remain fixed.
(1)
(2)
(3)
(4)