


[Camera] Setting Initial Camera Settings and External Device Name
53
5
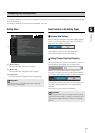
Setting Page
Camera Control
(1) [Digital Zoom]
Set digital zoom to [Disable] or [Enable].
The higher the digital zoom ratio, the lower the image
quality becomes.
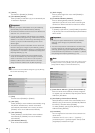
(2) [Image Stabilizer]
Select [Disable], [On1] or [On2] for image stabilizer.
Image stabilizer has the effect of correcting blurry
images. Try [On2] if the image is still blurry after
selecting [On1].
If you have selected [On1] or [On2] as the image
stabilizer setting, the viewing angle will be smaller and
the image more coarse than when [Disable] is
selected. This is not a malfunction.
(3) [AGC Limit]
Select one of 5 levels from 1 to 5 to automatically set
the upper gain limit. The greater the value, the higher
the sensitivity becomes. If you do not want to use the
automatic gain adjustment, select [OFF]. Setting the
[AGC Limit] allows you to record dark scenes without
gain adjustment.
Day/Night
(1) [Mode]
Set Day/Night mode to [Manual] or [Auto].
It is also possible to switch between [Day Mode] and
[Night Mode] using Admin Viewer Night Mode
function (p. 139).
If you have selected [Auto], set [Switching Brightness]
and [Response (sec.)] according to the environment
in which the camera is installed as well as the desired
switching conditions.
(2) [Switching Brightness]
Set the brightness at which [Day Mode] and [Night
Mode] will be switched. Select [Darker], [Slightly
Darker], [Standard], [Slightly Brighter] or [Brighter].
Select [Darker] if you want to capture video in color as
much as possible.
Select [Brighter] to reduce noise. Note that this mode
switches to black & white sooner.
(3) [Response (sec.)]
Set the time in seconds needed for judgment on
switching between [Day Mode] and [Night Mode].
Select [60], [30], [20], [10] or [5].
The mode will switch between [Day Mode] and [Night
Mode] if brightness remains above or below the level
set in (2) for the number of seconds specified.
Select [30] or [60] if brightness changes frequently,
such as when a light source passes in front of the
camera. Select [5] or [10] if change in brightness is
minimal.
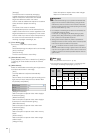
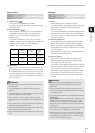
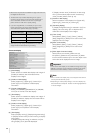
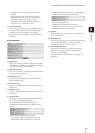
Degree of
blurriness
corrected
Viewing angle
ratio
Effective
pixels
Disable — 100%
Approx. 2.07
megapixels
On1 Small 83%
Approx. 1.44
megapixels
On2 Large 50%
Approx. 0.52
megapixels
Important
• If [On2] is selected, it is best to select a video size smaller
than “960 x 540”.
• The image stabilizer is not effective when the subject is
shaking.
• The image stabilizer is not effective beyond a certain level of
vibration or against momentary vibration.
• See “Important” on p. 92, p. 98 for precautionary notes
regarding Admin Tools configuration when image stabilizer is
set.
• See “Important” on p. 134 for precautionary notes regarding
the Viewer when image stabilizer is set.
• [AGC Limit] is disabled when [Exposure] is set to [Manual] or
[Auto (Flickerless)] in the Admin Viewer.
• Minimum subject illumination may change when [AGC Limit]
is set.
Important
• If [Auto] is selected for [Day/Night], conduct a thorough
operation test to check the effectiveness of the setting
beforehand.
• If [Auto] is selected for [Day/Night], set [Exposure] of the
Admin Viewer to [Auto], [Auto (Flickerless)] or [Auto (Shutter-
priority AE)] (p. 138).
• To use with infrared illumination, set [Day/Night] to [Manual].
When Day/Night Mode is set to [Manual], in additional to the
Day/Night function of the Admin Viewer (p. 139), it is also
possible to switch Day/Night Mode via settings in [Setting
Page] > [Event] > [External Device Input] (p. 63) or [Event] >
[Timer] (p. 64).
• When [Day Mode] and [Night Mode] are switched, the image
may not focus correctly depending on the brightness.
• If [Day/Night] is set to [Auto], the infrared cutoff filter may
move several times while the mode is switching between
[Day Mode] and [Night Mode]. Pan, tilt, zoom and manual
focus will not work during this period.