


3-27
Cisco UCS C210 Server Installation and Service Guide
OL-20887-02
Chapter
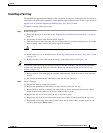
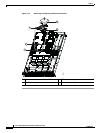
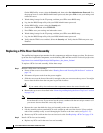
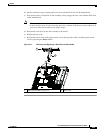
f. Loosen the two captive screws that hold the heatsink to the chassis posts and lift the heatsink out of
the server (see
Figure 3-14).
g. If you plan to use this heatsink with your new CPU, clean the old thermal compound from the bottom
of the heatsink.
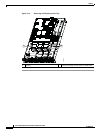
h. Unhook the CPU socket latch and open the CPU cover plate.
i. Lift the CPU out of the socket and set it aside on an antistatic mat or in an antistatic bag.
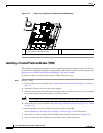
Step 2 Install a CPU and heatsink:
a. Set the new CPU into the socket, being careful to orient the CPU alignment notches with the
alignment keys in the socket.
b. Close the CPU cover plate and hook the socket latch back in the locked position.
c. Prepare the thermal compound, which aids heat transference between the CPU and the heatsink:
• If you are installing a new heatsink, a thermal pad comes pre-applied on the heatsink. Remove the
protective film to expose the thermal pad. Do not use the syringe of thermal compound that is
shipped with a replacement CPU in this case.
• If you are using your existing heatsink, make sure that all of the old thermal compound is removed
from the underside of the heatsink. Then apply the full contents of the syringe that is supplied with
the new CPU to apply thermal compound to the top of the CPU. Apply the compound as evenly as
possible so that it forms an even layer when the heatsink is tightened down.
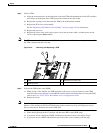
d. Align the heatsink captive screws with the chassis posts, and then tighten both captive screws evenly.
e. Replace the air duct and the top cover. When you replace the air duct, align the holes on each end
of the duct with the chassis standoff posts, then press down on both ends until the plastic latches
engage with the posts.
f. Replace the server in the rack, replace power cords and any other cables, and then power on the
server by pressing the Power button.