


Solving Problems 27
English
Problems and Solutions
Check the solutions below if you are having
problems using the product.
Setup problems
The product makes noise after you turn it on.
■ Make sure the protective tape is not blocking the
print head. After releasing the print head, turn
off the power, wait a moment, then turn it back
on.
The product makes noise after ink cartridge
installation.
■ When you install ink cartridges, the ink delivery
system must be charged. Wait until charging is
finished, then turn off the product. If you turn it
off too soon, it may use extra ink the next time
you turn it on.
■ Make sure the ink cartridges are seated securely
and no protective material remains in the
product. Open the cartridge cover and push the
cartridges down until they click into place. Turn
off the power, wait a moment, then turn it back
on.
A screen that prompts you to restart the computer
did not display after finishing the software
installation.
■ The software has not been installed correctly.
Eject and insert the CD-ROM, and then install
the software again.
Printing and copying problems
The product makes printing sounds, but nothing
prints.
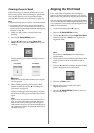
■ The print head nozzles may need cleaning
(& “Checking the print head” on page 22).
■ Make sure the product is on a flat, stable surface.
The margins are incorrect.
■ Make sure your original is positioned in the top
left corner of the document table.
■ If the edges of the copy are cropped off, move the
original away from the corner slightly.
■ Make sure the paper size settings are correct for
the paper you have loaded.
■ Make sure your paper is loaded short edge first,
all the way to the right, with the left edge guide
lightly against the paper (& “Loading Paper” on
page 6).
■ Do not load paper above the c arrow mark
inside the left edge guide (& “Loading Paper” on
page 6).
Blank pages are printed.
■ Make sure the paper size settings are correct for
the paper you have loaded.
■ The print head nozzles may need cleaning
(& “Cleaning the print head” on page 23).
Paper feed problems
Paper does not feed correctly or is jammed.
■ If paper does not feed, remove it from the sheet
feeder. Fan the paper, load it against the right
side, and slide the left edge guide against the
paper (but not too tightly). Make sure the paper
is not in front of the feeder guard.
■ Do not load paper above the c arrow mark
inside the left edge guide (& “Loading Paper” on
page 6).
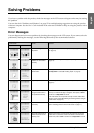
■ If paper is jammed, the icon or the message is
displayed on the LCD screen. Follow these steps
to clear the jam:
1. Press the x Start button to eject the jammed
paper. If the jammed paper is not ejected, go on
to the next step.
2. If the paper is stuck near the sheet feeder or
output tray, gently pull it out then press the
x Start button.
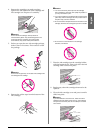
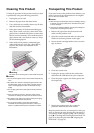
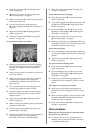
If the paper is stuck inside the product, press the
P On button to turn it off. Open the scanner unit
and remove any paper inside, including any torn
pieces. Do not pull it backward; this can damage
the sheet feeder. Close the scanner unit, then
turn the product back on.
■ If paper jams frequently, make sure the left edge
guide is not pushed too tightly against the paper.
Try loading fewer sheets of paper.
Print quality problems
You see banding (light lines) in your printouts or
copies.