Registering Human Face Personal
Authentication Information
By registering the face of a person beforehand, focus and brightness can be
adjusted automatically by the face tracking function. Up to 6 faces, together
with names and priority levels, can be registered.
It is recommended to register the faces that are often being recorded by this
camera beforehand.
*The following is a screen of the model with Wi-Fi functions.
1
Open the LCD monitor.
.
0
Set the recording mode to either A video or B still image.
0
To switch the mode between video and still image, tap A or B on the
recording screen to display the mode switching screen.
Tap A or B to switch the mode to video or still image respectively.
(You can also use the A/B button on this unit.)
2
Tap “MENU”.
.
0
The top menu appears.
3
Tap “SETUP”.
.
4
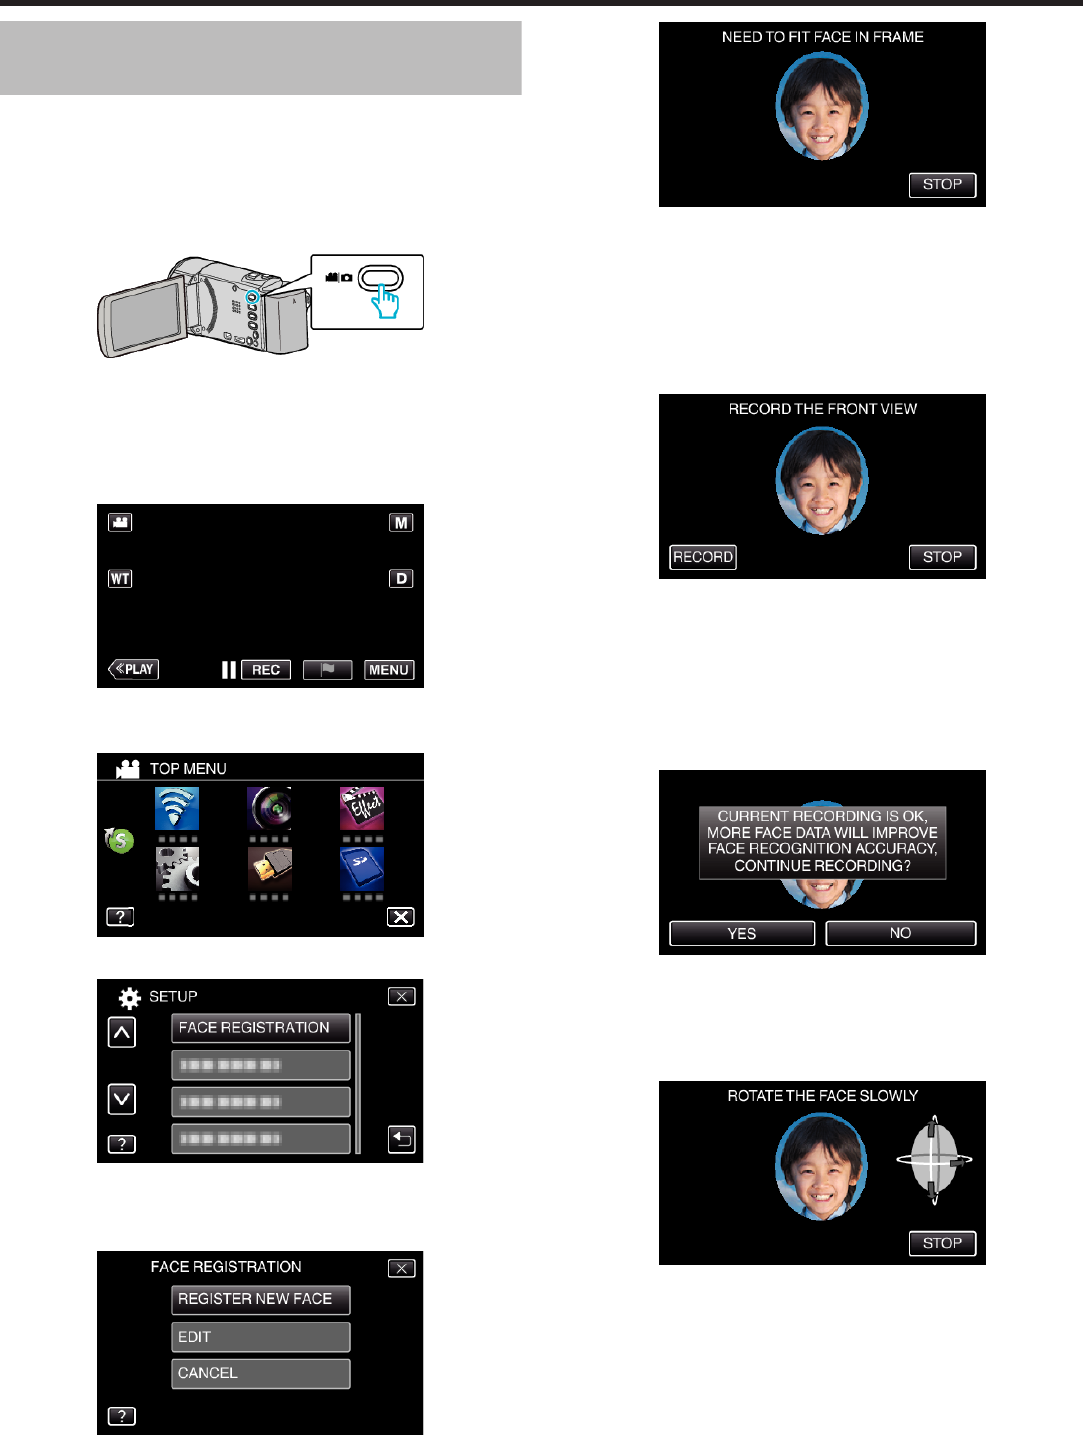
Tap “FACE REGISTRATION”.
.
0
Tap L to exit the menu.
0
Tap J to return to the previous screen.
5
Tap “REGISTER NEW FACE”.
.
6
Point the camera toward the human subject.
.
0
Information is collected before face registration recording. The frame
appears blinking while information is being collected.
0
Adjust to fit the face within the frame while it is blinking. The frame
stops blinking and lights up after information collection is complete.
0
To cancel the registration, tap “STOP”.
When “CANCEL FACE RECOGNITION?” appears, tap “YES” to
return to the normal recording mode.
7
Tap “RECORD” and record the face from the front.
.
0
A face is captured to be used on the face registration index screen.
0
Other than tapping “RECORD”, you can also record by pressing the
SNAPSHOT button fully.
0
A sound can be heard when recording is complete.
0
To cancel the registration, tap “STOP”.
When “CANCEL FACE RECOGNITION?” appears, tap “YES” to
return to the normal recording mode.
8
Tap “YES” to continue recording.
.
0
To proceed to collect face information in the four directions of up,
down, left, and right, tap “YES”. It is recommended to continue
recording to increase the accuracy of face recognition.
0
To end face registration recording, tap “NO”. Go to step 11.
9
Rotate the face slowly in four directions to register the face information.
.
0
Rotate the face slowly while looking at the camera. A sound can be
heard when recording is complete for each direction. (4 times in total)
Repeat the step until recording (registration) is complete for all
directions.
0
Registration of the four directions may fail depending on the shooting
environment. In this case, tap “STOP” to cancel recording, then tap
“NO” and go to step 11.
0
If the face cannot be properly recognized during recording, register
the face again.
10
Face the camera with a smiling face.
Recording
48


