


43
Setting the menu items
Setting the menu items
When the unit’s settings are to be selected, the menus are
displayed on the monitor.
The monitor is connected to the video signal output
connector (VIDEO OUT connector or HD/SD ANALOG
connector).
The basic menu operations involve displaying sub-menus
from the main menu items, and selecting settings on the
sub-menus.
Some sub-menus have menu items for performing more
detailed settings.
For details on the basic operations to display the menus
and change the items using the accessory wireless remote
control or controller (AW-RP655, AW-RP555 or AW-RP400),
ref
er to pages 40 to 4
2.
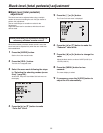
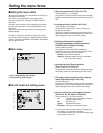
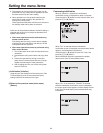
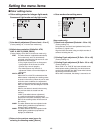
Main menu
HE100 menu
Pan Tilt Head Setting
Camera Setting
1--------
2--------
1 Pan Tilt Head Setting menu display
2 Camera Setting menu displa
y
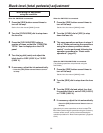
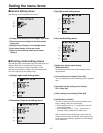
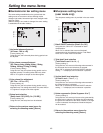
Pan-tilt head unit setting menu
Pan Tilt Head Setting
Tally On
Landing Soft
Install Position Desktop
Smart Picture Flip Auto
Flip Detect Angle 90
Controller All
Initialize
Return
3--------
4--------
5--------
6--------
7----------
8--------
9------
------
3 Tally lamp use selection [Tally: On, Off]
(Factory setting: On = controlled)
Using this item, set the function for having the tally lamp
lighted or extinguished by the tally control signal to ON or
OFF.
4 Landing selection [Landing: Soft, Just]
(Factory setting: Soft landing)
Using this item, select “Soft” or “Just” (exact) as the
landing characteristics.
The level of vibration accompanying the acceleration or
deceleration initiated by the stop operation is less at the
“Soft” setting than at the “Just” (exact) setting.
5 Desktop (stand-alone) installation/
Hanging (suspended) installation selection
[Install Position: Desktop, Hanging]
(Factory setting: Desktop)
Using this item, select stand-alone (Desktop) or
suspension from an overhead surface (Hanging) as the
manner in which the unit is to be installed.
Desktop: Stand-alone installation
Hanging:
Installation where the unit is suspended
from an o
verhead surface
6 Automatic picture flipping selection
[Smart Picture Flip: Auto, Off]
(Factory setting: Off = no flipping)
Using this item, select the function for flipping the picture
when tilting reaches the specified angle to ON or OFF.
7 Tilt angle at which automatic picture flipping
starts [Flip Detect Angle: 60 to 120]
(Factory setting: 90°)
Using this item, select the tilt angle at which the picture is
flipped when “Auto” has been selected as the automatic
picture flipping selection [Smart Picture Flip] setting.
8 Accept control from control device selection
[Controller: All, RP, Option, RP/Option]
(Factory setting: All = All control devices)
All: All control de
vices (Including accessory
wireless remote control)
RP: Controller only
Option: Expansion board only
RP/Option: Controller and e
xpansion board
At the point when this item’
s setting is changed, the
new setting is not reflected in operation.
It is reflected when the unit is set to the standby mode
and its power is turned on.