


7
Installation precautions
In addition to heeding the points presented in the “Safety precautions”, observe the following
precautions as well.
Concerning the installation location
After conferring in detail with your dealer, choose a sturdy
ceiling or other surface, and install the unit.
Install the unit on a ceiling that is strong enough (such as
a concrete ceiling).
If the unit is to be installed on a ceiling which is not strong
enough, reinf
orce the ceiling sufficiently first.
Do not install or use the unit in the following kinds of
locations.
On w
alls (where the unit would be installed sideways)
In locations (including places such as under the ea
ves of
a building) where the unit would be directly exposed to
rain or water
In locations such as kitchens where there are high
concentr
ations of steam and grease
In outdoor locations or hot places where the temper
ature
will exceed 104 °F (40 °C)
In cold locations where the temper
ature will drop below
32 °F (0 °C)
In locations where the humidity will exceed 85 %
In locations where chemicals are used such as near
s
wimming pools
At sea, in coastal areas or in locations where corrosiv
e
gases are emitted
In locations where the unit w
ould be subject to a great
deal of vibration such as on board a vehicle or ship (this
unit is not designed to be used in vehicles)
In locations where the temper
ature is subject to sudden
changes such as near the air outlet of an air conditioner
or near a door which allows the outside air to come in
What to avoid to ensure that the unit will perform stably
over a prolonged period
Using the unit f
or a prolonged period in a location with
high temperature and humidity levels will cause its parts
to deteriorate and shorten its service life.
Do not e
xpose the unit directly to the heat given off in the
installation location or heat from a heater or other such
appliance.
The accessory parts provided with the unit must be
used without fail to install the unit.
Be absolutely sure to use the mounting brackets and
mounting screws provided with the unit to install the unit.
Separately obtain the screws used to mount the
installation surface bracket.
This unit does not come with the screws used to mount the
installation surface bracket.
Obtain the hexagon head bolts (M6), spring washers, flat
washers and, if necessary, nuts.
Tightening the installation screws
Tighten up the scre
ws and bolts to an extent that is
commensurate with the materials and structures in the
installation location.
After tightening up the scre
ws and bolts, visually inspect
for any ricketiness or play, and check that the unit is
secured properly in place.
Use the specified tools and tighten the scre
ws fir
mly.
When the unit is no longer going to be used, do not
leave it lying around, but be absolutely sure to dispose
of it properly.
When installing or disposing of the unit, be absolutely
sure to hold it by its pedestal area.
An
accident may occur if its rotating part is held or rotated
by hand.
Do not attach a filter, hood, extender or other parts to
the unit.
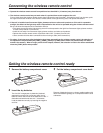
Be absolutely sure to use size “AA” manganese dry
batteries for the wireless remote control.
Do not use any other kind of batter
ies.
Install the unit near the main power outlet, and position
it in such a way that its power plug can be plugged into
and unplugged from the outlet easily.
Do not connect a regular LAN line or telephone line to
the CONTROLLER connector on the unit.
Doing so may cause malfunctioning.