


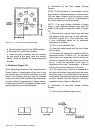


(8) Look through the camera and observe the
vertical line target. Compare the observed
image with Figure 3-4 to determine if the
camera is within specications.
NOTE : There is no separate close-focus
adjustement on the camera. if the focus
wheel has reached its stop before maximum
resolution is achieved, return to the innity
check. If there is any tolerance at that setting,
readjsut the innity setting as close as possilbe
to the focus wheel stopping point and recheck
the close focus. If it is still impossible to obtain
a sharp image, the lens is defective and the
shutter must be replaced.
NOTE : The foregoing tests assume that when
the camera is operated, the viewing mirror
(Fresnel carrier) reaches the correct attitude
during the exposure cycle. If the lens has been
correctly collimated, the only check possible of
actual picture denition is to expose lm.
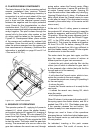
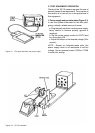
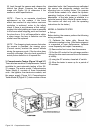
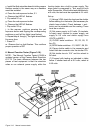
3. Comprehensive Testers (Figure 3-6 and 3-7)
There are two models of Comprehansive Testers
available for semi-automatic testing of the SX-
70 camera. The earlier model, Comprehensive
Tester Model A, consists of three interrelated
units : the lightbox, the electronics module, and
the power supply (Figure 3-6). Comprehensive
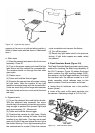
Tester Model B (Figure 3-7) also consists of three
interrelated units : the Comparalumen calibrated
ligh source, the electronics module, and the
mounting horn or holding xture. The purpose
of both tester models is to check the dynamic
operating functions of the camera ( A detailed
description of the later tester is available in a
technical manual titled «Model B camea tester».
This section will deal only with the operating
instructions for the tester.)
MODEL A CAMERA TESTER
a. Set-up
Before testing the camera, perform the following
set-up procedure.
(1) Calibrate the tester daily. Record the
calibration reading in a log. (If the test equipment
is suspected of poor performance, calibrate
more frequently and repair if necessary.)
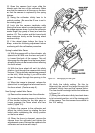
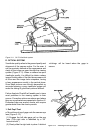
(2) Remove the front cover from the camera
(3) Set the L/D control to the mid-range position
usiong the trim reset cam and focus the camera
at innity.
(4) using the S7 actuator, close teh s7 switch.
(5) Allow the tester to warm up for a period of
30 minutes.
Figure 3-6 Comprehensive tester