


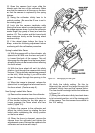

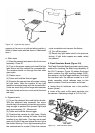

(4) Slide the camera fully onto the horn.
(5) Select the light level desired on the
Comparalumen and slide the horn up against
the appropriate window. (Position the horn so
that the locating pad on the front of the horn
touches the window.)
(6) Insert a remote shutter release cable into
the socket on the right side of the shutter.
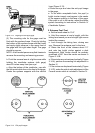
(7) Rotate the RANGE switch on the electronics
module to the SX-70 EXP position.
(8) Lift the EXPOSURE-APERTURE MODE
switch to the EXPOSURE position.
(9) Press the remote shutter trip button and
read the exposure on the meter.
(10) Return the EXPOSURE-APERTURE
MODE switch to the RESET position.
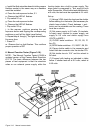
d. 10.4’’ Aperture Measurement
NOTE : This measurement must be preceded
by steps 1 throught of the Ambient Exposure
Measurement procedure, then complete the
following :
(1) Rotate the camera focus wheel to the 10.4’’
setting.
(2) Insert a used ash bar into the camera ash
socket and position the spring clip (supplied with
the tester) over the ash bar so the photocell is
covered.
(3) Select the 800 cdls/ft² on the Comparalumen
and position the camera at the right-hand
screen.
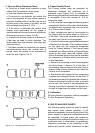
(4) Rotate the RANGE switch to the 10.4’’
position.
(5) Place the EXPOSURE-APERTURE MODE
switch in APERTURE position.
(6) Press the remote shutter trip button and read
the aperture in the relative stops, on the meter.
(7) Return the EXPOSURE - APERTURE
MODE switch to the center (RESET) position.
NOTE : If a meter reading goes off scale (greater
than +1 stop), press the +1 stop pushbutton
on the electronics module and read the meter,
adding +1 stops to whatever the meter is
indicating.
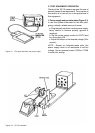
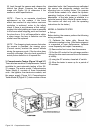
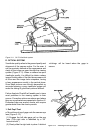
4. Light Leak Tester (Figure 3-8)
Caution : When using the light leak tester, always
hold the xture so the camera is in the uppermost
position witgh the lens pointing down. There is
no latching device on the xture and the camera
could slide off it the xture were pointed down.
The light leak tester consists of two checks : the
static test (with the camera in the mirror down or
viewing position) and the dynamic test (with the
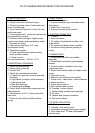
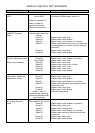
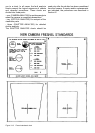
COMPARALUMEN LIGHT LEVELS TABLE
800 cdls/ft² - Move the center switch on the Comparalumen to the right to
illuminate the right (high level) screen, No lters are used for the
800 cdls/ft² level.
100 cdls/ft² - Proceed as for the 800 cdls/ft² level, but insert both lters (one
stop down and two stops down) into the slot above the right
(high level) screen.
50 cdls/ft² - Move the center switch to the left to illuminate the left (low level)
screen. No lters are used for the 50 cdls/ft² level.
6.25 cdls/ft² - Proceed as for the 50 cdls/ft² level, but insert both lters (one
stop down and two stops down) into the slot above the right (low
level) screen.
NOTE : On some Comparalumens it has been found necessary to reverse the lters when used
to reduce the 50 cdls/ft² to 6.25 cdls/ft². In this case the lters are labeled so that the proper label
(100 or 6.25) must facing the operator when the lters are used.
Caution : To avoid possible delamination of the lters, do not leave the Comparalumen on at
100 cdls/ft² any longer than necessary. It should not be on any longer than the minute or two
needed to check the camera.