


230
– DCR-TRV25E/TRV27E/TRV116E/
TRV118E only
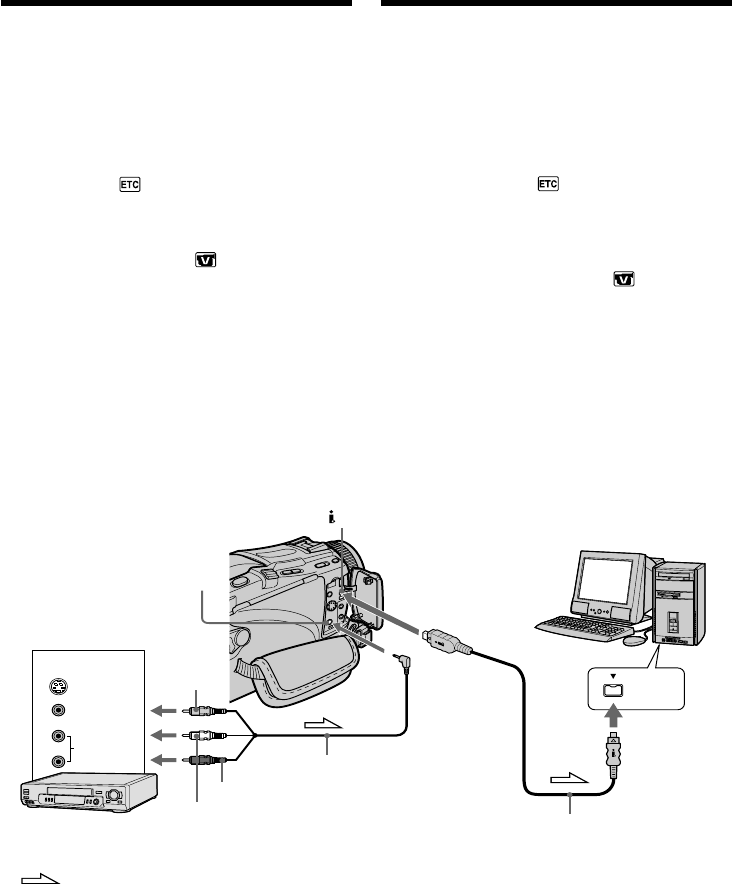
You can capture images and sound from an
analog video unit connected to your computer
which has the i.LINK (DV) jack connected to
your camcorder.
Before operation
Set DISPLAY in to LCD in the menu settings.
(The default setting is LCD.)
(1)Set the POWER switch to VCR.
(2)Set A/V t DV OUT in to ON in the
menu settings (p. 236).
(3)Start playback on the analog video unit.
(4)Start procedures for capturing images and
sound on your computer. The operation
procedures depend on your computer and the
software you are using.
For details on how to capture images, refer to
the instruction manuals of your computer and
software you are using.
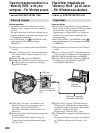
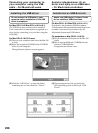
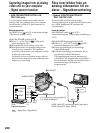
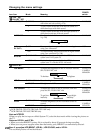
Capturing images from an analog
video unit on your computer
– Signal convert function
i.LINK
AUDIO/VIDEO
DV IN/OUT
VIDEO
AUDIO
S VIDEO
OUT
i.LINK cable (DV connecting cable) (optional)/
i.LINK-kabel (DV-kabel, tillval)
: Signal flow/Signalflöde
Yellow/
Gul
White/
Vit
Red/
Röd
A/V connecting cable (supplied)/
A/V-kabel (medföljer)
VCR/
Videobandspelare
Föra över bilder från en
analog videoenhet till en
dator – Signalkonvertering
– Endast DCR-TRV25E/TRV27E/
TRV116E/TRV118E
Du kan ta bild och ljud från en analog
videoutrustning som är ansluten till en dator som
har i.LINK-kontakten (DV) ansluten till
videokameran.
Innan du börjar
Ställ DISPLAY under på LCD i
menyinställningarna. (Ursprunglig inställning är
LCD.)
(1)Ställ POWER-omkopplaren på VCR.
(2)Ställ A/V t DV OUT under på ON i
menyinställningarna (sid. 245).
(3)Starta uppspelningen på den analoga
videoutrustningen.
(4)Utför de nödvändiga procedurerna för att
överföra bild och ljud till datorn.
Tillvägagångssättet varierar beroende på
vilken dator och programvara du använder.
Mer information om hur du tar bilder finns i
bruksanvisningen till datorn och
programvaran.