


Preparation
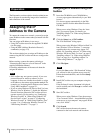
Assigning the IP Address to the Camera
7
Tip
The factory setting of the camera network is DHCP
mode for both LAN and Wireless LAN.
7
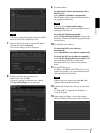
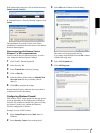
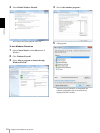
Select a camera you want to assign an IP address
from the list and click Network.
The account settings screen is displayed.
8
Register the name and password of the
administrator and click OK.
The factory settings for both items are “admin”.
The Network Setting screen is displayed.
9
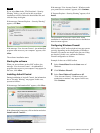
Set the IP address.
To obtain the IP address automatically from a
DHCP server:
Select Obtain an IP address automatically.
The IP address, Subnet mask and Default gateway
are assigned automatically.
Note
When you select Obtain an IP address
automatically, make sure that the DHCP server is
operating on the network.
To specify the IP address manually:
Select Use the following IP address, and type the
IP address, Subnet mask and Default gateway in the
relevant boxes.
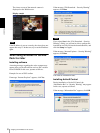
10
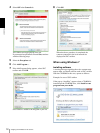
Set the DNS server address.
To obtain the DNS server addresses
automatically:
Select Obtain DNS server address automatically.
To specify the DNS server addresses manually:
Select Use the following DNS server address, and
type the Primary DNS server address and
Secondary DNS server address in the relevant
boxes.
11
Set the HTTP port No.
Normally, select 80 for the HTTP port No. To use
another port number, type a port number between
1024 and 65535 in the text box.
Note
When using a port number other than 80, check
with the network administrator first.
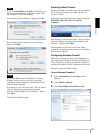
12
Confirm that all items are correctly set, then click
OK.
If “Setting OK” is displayed, the IP address is
correctly assigned.
13
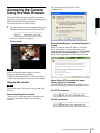
When setting is finished, to access the camera
directly, double-click the camera name in the list.