


G:\HDR_HVR\HVR_Kaihan\2514607111\2514607121HVRZ1E\01GB04REC.fm
master:Right
Recording
HVR-Z1E/Z1P
2-514-607-12(1)
Recording
39
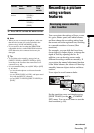
The audio level meter appears.
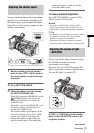
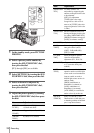
2 During recording or in the standby
mode, adjust the volume of the
microphone by turning the AUDIO
LEVEL dial.
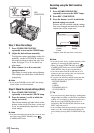
Adjust the microphone level of channel 1
by turning the CH1 dial, and that of channel
2 by turning the CH2 dial.
Adjust the internal microphone volume by
turning the CH1 dial.
To restore automatic adjustment
Set the AUDIO SELECT switch of the
manually adjusted channels to AUTO.
b Note
• You cannot adjust the volume of audio input via the
AUDIO/VIDEO jack or the HDV/DV jack.
z Tip
• To check the audio setting information in greater
detail, press STATUS CHECK (p. 25). You can also
check the microphone volume during automatic
adjustment.
• When using an external microphone, set [MIC
SELECT] on the (AUDIO SET) menu to [XLR]
(p. 66).
• To link the audio level of channel 1 and channel 2
when using external microphones, select the
(AUDIO SET) menu, [XLR SET], [XLR AGC
LINK], then [LINKED] (p. 67). Make sure that the
AUDIO SELECT switches, CH1 and CH2, are both
set to AUTO.
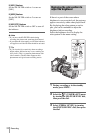
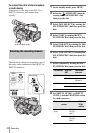
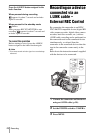
Connecting external audio
sources
Connect an external microphone and/or
audio device to the INPUT1/INPUT2
connectors.
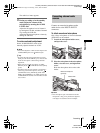
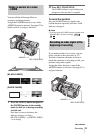
To attach an external microphone
Only a Sony microphone of 21 mm in diameter
(ECM-678) can be attached.
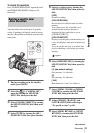
1 Loosen the microphone holder screw,
and open the cover.
2 Place the microphone in the microphone
holder, close the cover, and tighten the
screw.
Hook the microphone cable on the cable
holder.
b Note
• If the microphone part of the attached external
microphone is long, it may obstruct the light of a
video light, etc. attached to the shoe adaptor.
External microphone
(optional)
Cable holder
01GB04REC.fm Page 39 Thursday, June 9, 2005 8:40 PM