


14
EDIT LIVE VIEW CHANNELS
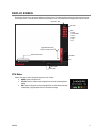
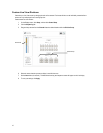
By default, the recorder only allows live video from four network channels at one time on the local server. This protects the processor
resources for recording data. The SCS software allows you to view live video from multiple recorders at once and with the same
limitations that the recorder has on the number of live IP based video channels. If more than four channels of live video are required on
the local server, you can enable the recorder to show up to 16 channels. Be aware that displaying 16 channels of live IP based video is
resource intensive and may dramatically impact system performance.
To enable the recorder to view 16 channels of live video:
1. Click Exit on the Display screen, and then select Restart in Windows Mode.
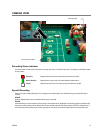
2. Double-click the Edit Live View Channels icon on the desktop.
3. Click Yes, and then click OK.
4. The live view display will switch to 16 channel mode. To return the recorder to 4 channel mode, repeat steps 2 and 3.
5. Double-click Surveillix Server to restart the recorder software.
The live view display will switch to 16 channel mode. To return the recorder to 4 channel mode, run the utility again using the same
instructions.
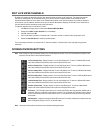
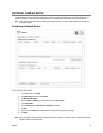
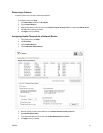
SCREEN DIVISION BUTTONS
Note When viewing live video from Network Cameras, only 4CH will display at one time. If more live view channels are required on the
local server, see the Edit Live View Channels instructions.
1st Four Cameras View – Displays cameras 1-4 in the Video Display Area. To return to a different Multi-Camera
View, select a different Screen Division option from the Screen Division menu.
2nd Four Cameras View – Displays cameras 5-8 in the Video Display Area. To return to a different Multi-Camera
View, select a different Screen Division option from the Screen Division menu.
3rd Four Cameras View – Displays cameras 9-12 in the Video Display Area. To return to a different Multi-Camera
View, select a different Screen Division option from the Screen Division menu.
4th Four Cameras View – Displays cameras 13-16 in the Video Display Area. To return to a different Multi-Camera
View, select a different Screen Division option from the Screen Division menu.
1st Nine Cameras View – Displays cameras 1-9 in the Video Display Area. To return to a different Multi-Camera
View, select a different Screen Division option from the Screen Division menu.
2nd Nine Cameras View – Displays cameras 10-18 in the Video Display Area. To return to a different Multi-
Camera View, select a different Screen Division option from the Screen Division menu.
Full Screen – The Full Screen Option allows you to view the Video Display Area using the entire viewable area on
the monitor. When this is selected, no menu options are visible. You can activate the Full Screen Option by clicking
on the Full Screen button within the Screen Division menu. You can deactivate Full Screen mode by right clicking
on the screen.
Auto Sequence – Sequences through the Screen Divisions sets. For example, selecting the 1A and then the Loop
button will sequence through 1A, 2A, 3A, 4A and then repeat.
Note Local screen division options are limited to ensure optimal encoding performance.