


- 14 -
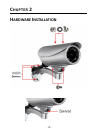
2.1 Assembling the Camera Mounting Bracket
Assemble the sun visor and camera mounting bracket to the camera by
using the provided screws and washers, and then the camera can be
mounted on the wall (or ceiling) securely through the three screw holes
on the base of the holder.
Adjust the camera position
Once you have mounted the camera to the wall (or ceiling), you need to
adjust the camera position to focus on the location where you want to
monitor. You can adjust the camera position easily by using the swivel
ball on the camera holder.
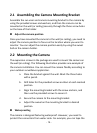
2.2 Mounting the Camera
The expansion screws in the package are used to mount the camera on
the wall (or ceiling). The following illustration provides one example of
the camera installation. You can mount the camera flexibly according to
your outdoor surveillance application.
a. Place the bracket against the wall. Mark the three holes
with a pencil.
b. Drill holes for the provided screws anchors at each marked
position.
c. Align the mounting bracket with the screw anchors, and
then use the provided screws to secure it.
d. Secure the camera to the mounting bracket.
e. Adjust the swivel on the mounting bracket to desired
position.
Waterproofing
The camera is designed featuring waterproof. However, you need to
protect the connectors from water soak. For example, you can tape the