


Getting Started User Guide
12
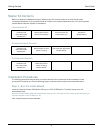
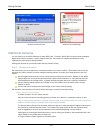
TELL US ABOUT YOUR SYSTEM
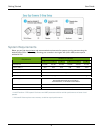
This screen allows you to specify the number of cameras you are putting on
the system during this install and how they are connected to the computer,
i.e. via a WiLife USB Adapter, Other HomePlug Powerline Adapter, or Non-
Powerline LAN.
(Typically, the answer to this last question is the WiLife USB adapter.)
Click Next> to continue.
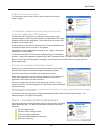
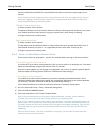
PLUG IN YOUR POWERLINE ADAPTER
Now, you are ready to plug in the USB Receiver.
Plug the USB Receiver Module directly into a wall outlet near your PC.
Use the included USB Cable to connect the USB Receiver Module to one of
the available USB ports on your PC.
Click the Next> button when you are done.
Note: The USB Receiver Module has built in surge protection and must be
plugged directly into your wall outlet. It is highly recommended that you do
not plug the USB Receiver Module into a surge protected power strip.
Plugging the USB Receiver Module into a surge protected power strip may reduce the quality and performance
of the WiLife system.
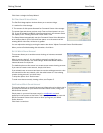
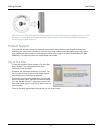
STEP 3 — PLUG IN YOUR CAMERA
With the receiver plugged into your electrical outlet, you are ready to plug in
your cameras.
1) Start by installing your cameras in a location near your PC. This
makes it easier to adjust the focus if necessary. Once you have
focused your camera, select a new location for the camera and use
one of the convenient mounting options to place your camera on a
desktop, window, or wall.
Installation Note: If mounting the camera on a window, clean the area of the window where the
suction cup will be attached. Let the area dry completely before mounting camera.
The Window Mount Suction Cup has been tested and proven to hold the weight of objects heavier than
the camera for extended periods of time. To ensure long term connection, however, you can spread a
very small drop of vegetable or olive oil on the under-side of the cup before applying it to the window.
This increases the suction power of the cup.
CAUTION: The camera should be mounted indoors or in a weatherproof enclosure. Additionally, for the
Outdoor Camera, mount the camera high and at an angle so the front of the camera tilts down,
allowing the sun-shield to shade the sensor. This will provide the best quality picture.
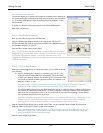
Plug the Camera Power Supply into a nearby outlet. Then, use the included Camera Cable (8 ft. Standard
Ethernet Cable) to connect the power supply to the camera.
Note: The Camera Power Supply has built in surge protection and must be plugged directly into your
wall outlet. Plugging the Camera Power Supply into a surge protected power strip may reduce the
quality and performance of the WiLife system.
Click the Next> button to proceed.