


Using The Network Administrator User Interface 59
5 Click OK
This completes associating rules with a group.
Displaying And Changing Rules Associated With A Group
To display and change the rules associated with a group, follow these
steps:
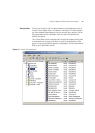
1 Either click on Groups in the Tree pane or if you have created
Organizational Units to structure your groups, click on the organizational
units subfolders until you reach the desired unit holding the group.
2 Select the group in the Details pane and right-click. Select Properties.
The Properties dialog window will appear.
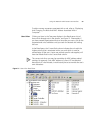
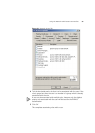
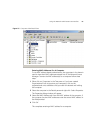
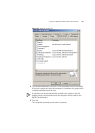
3 Select the Network Access tab, a list of rules created with 3Com Network
Access Manager and for which you have read permission will be
displayed in the window, see Figure 24. The tick box indicates how the
rule is to be applied to the group, see Table 9.
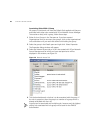
4 You can change which of these rules are applied to a group by either
ticking or removing the tick from rules that are black.
To change the rules applied indirectly through being a member of
another group, select the other group from the Detail pane and apply
steps 1 to 4 above on the other group.
A group can be associated with multiple rules, however only the highest
priority rule associated with the group will be used for the RADIUS
authorization.
5 Click OK
6 If EFW policies are used, click on the Recalculate EFW Membership
button.
This completes displaying and changing the rules associated with a
group.
Table 9 Rules Tick Box for A Group
Tick Box Setting Meaning
Black, not ticked The rule does not apply to this group
Black, ticked The rule is applied to this group
Grey, ticked The rule is applied to this group indirectly through the
group’s membership of one or more groups that have the
rule specifically applied