


46 Printing with Windows
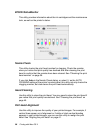
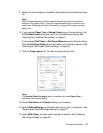
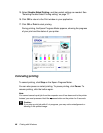
3. Select the Media Type setting that matches the paper loaded in the printer.
See "Media Type setting list" on page 50.
Note:
❏ Check the media type and its paper path. See "Paper path list" on page 152.
❏ The Media Type setting determines what other settings are available in the
printer driver, so make sure you select this setting first.
❏ Some media types are not available depending on the Source setting you’ve
selected (see step 8, below).
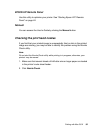
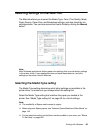
4. Select Color (to print color or monochrome photos) or Black (to print a
draft or black text only) as the Color setting.
If you want to fine-tune your monochrome prints, select Advanced B&W
Photo.
5. Select a Print Quality setting. For additional options, select Quality
Options from the drop-down list.
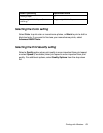
6. Select Automatic as the Mode setting.
If you selected Color as the Color setting, select a Color Control Mode
setting from the Mode drop-down list. For more information, see "Color
Control mode" on page 52.
If you selected Advanced B&W Photo as the Color setting, select a Color
Toning setting from the Mode drop-down list. For more information, see
"Color Toning" on page 53.
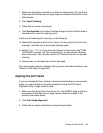
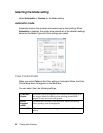
7. Select a paper source from the Source drop-down list.
Note:
Some paper sources may not be available for the media type setting you
selected.
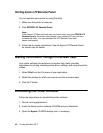
8. Select Borderless to print without margins. See "Selecting the Borderless
setting" on page 63.
Note:
The Borderless feature is only available for select media types and paper paths.