


6-4
Maintenance and Troubleshooting
L
Proof Sign-off:
Ohtera _______
Fujimori _______
Pipa _______
R4C3700
Rev.D
A5 size CHAP6.FM
4/21/99 Pass 0
The camera doesn’t take a picture after you press the
shutter button.
The flash may be recharging. Wait until the status
light beside the viewfinder turns green, and try
again.
The camera may be connected to your computer.
When it is connected, you cannot use any of the
buttons on the camera itself. See the
EPSON
Photo!2 User’s Guide
for instructions on taking
pictures from your computer.
The camera’s memory may be full. Check the
picture counter on the display panel. If it reads 0,
your camera’s memory is full. Erase some pictures
using the LCD monitor, or transfer the pictures to
your computer and then erase them.
Note:
❏
To erase pictures with the LCD monitor, while
holding the
Function
button down, press the
ESC
button. To transfer pictures to your
computer before erasing them, see the EPSON
Photo!2 User’s Guide.
❏
Installing an optional CompactFlash Card allows
you to take more pictures without deleting any
images in the camera. See “Using CompactFlash
Memory Cards” on page 5-1 for details.
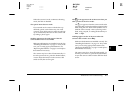
The camera takes too long to take a picture.
You may be pressing the shutter button all the
way down at once. This forces the camera to focus,
make exposure adjustments, and capture the
image all at once. You can have the camera
perform these operations separately to make the
process more efficient. First, hold the shutter
button halfway down to lock the auto focus, then
press the shutter button the rest of the way down
to take the photo. For more information, see
“Taking Pictures Using the Viewfinder” on page
2-5, or “Taking Pictures Using the LCD monitor”
on page 2-7.
If you want to reduce the time lag between
pictures, use the quick shooting mode. See
“Taking the 2nd picture quickly” on page 2-13.
The flash does not work.
Make sure the flash is set to or . See “Setting
the flash” on page 2-4 for more information on
setting the flash.
Make sure the batteries are installed correctly. See
“Installing the batteries” on page 1-6. Also, make
sure you are using appropriate batteries. See
“Replacing the batteries” on page 1-8, and replace
the batteries if necessary.