


7
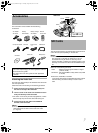
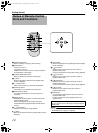
This camcorder comes bundled with the following
accessories.
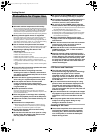
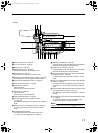
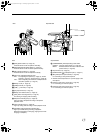
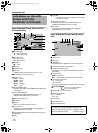
Attaching the Audio Unit
The audio unit (with handle) is not attached to the camcorder
unit when purchased.
Attach the audio unit according to the following procedure.
1 . Attach the audio unit by sliding it all the way into
the shoe on the top of the camcorder.
2 . Turn the screw on the audio unit clockwise to fasten
it fully and securely to the camcorder.
TIf the audio unit is not fully and securely tightened, it will be
loose and may drop off from the camcorder during use.
3 . Connect the audio unit cable to the AUDIO IN
terminal of the camcorder.
Memo :
● The clamp on the audio unit is for fixing the microphone
cable and cannot be used to fix the audio unit cable.
(A Page 18)
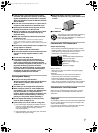
This camcorder saves the recorded images and audio sound
on the SD card (sold separately) in the card slot.
Memo :
● If the SD card contains files recorded by devices other than
this camcorder or files that are saved from a PC, the
recordable time may be shorter or data may not be
properly recorded. In addition, the remaining space on the
card may not increase even when files are deleted using a
PC.
Make use of the following SD cards.
Video : SDHC card that supports Class 6 or higher
(4 GB to 32 GB)
Still Picture : SD card (256 MB to 2 GB), SDHC card (4 GB
to 32 GB)
● Panasonic, TOSHIBA, or SanDisk
Using cards other than those specified above may prevent
data from being recorded correctly or result in loss of
data.
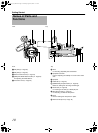
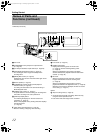
Accessories
The CD-ROM provided with this camcorder comes with
[JVC ProHD Clip Manager] and other application software
as well as the user guides.
TFor detail, refer to the user guides for each application
software.
AC Adapter
AP-V21M
Battery
BN-VF823U
Remote
Control Unit
CD-ROM
Audio Unit
Component Cable
AV Cord
USB Cable
Battery Charger
AA-VF8KR
Microphone
Power Cord
ן2
SD Cards
Audio Unit
Screw
Shoe
Cable
AUDIO IN Terminal
Open the cover
Clamp
M9H7_EN_001D.book Page 7 Thursday, August 26, 2010 11:51 AM